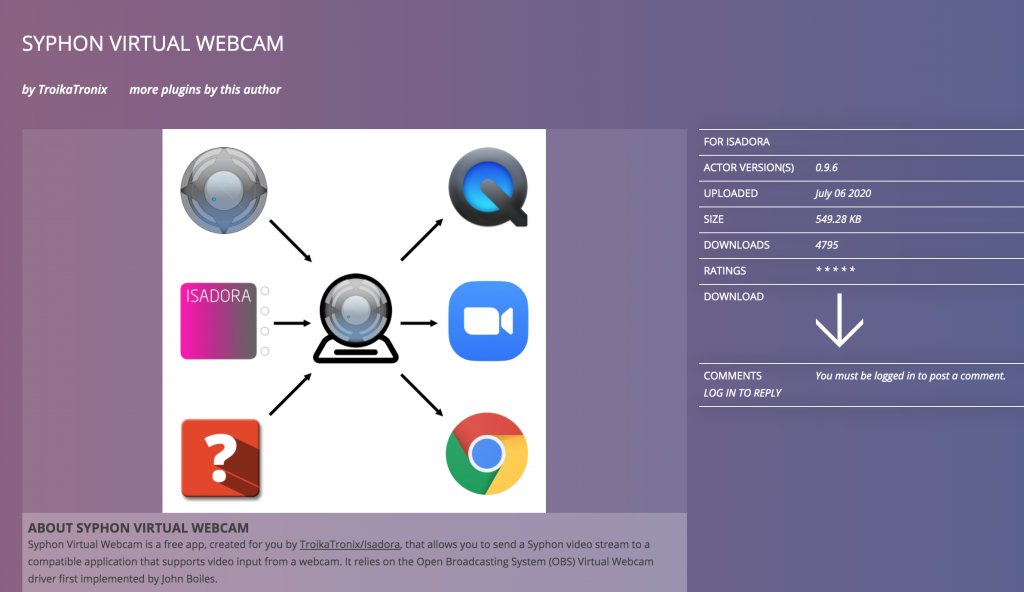
Syphon! Virtual! Webcam!

Welcome to another mini resource! This short tutorial is for the usage of the Troikatronix application, Syphon Virtual Webcam.
There a few ways that you can learn!
You can watch the experts do it on the Troikatronix YouTube Channel.
or
You can follow through with my screenshots and process using OSX.
or
Utilise the wealth of resources also available online!
This is not an Isadora plugin, it is simply developed by Troikatronix, the organisation that builds and operates Isadora. This application is only available for Mac OS users, currently. Different versions of operating systems may also cause various changes and issues.
The simple first step, is to download the plugin from the Troikatronix website.
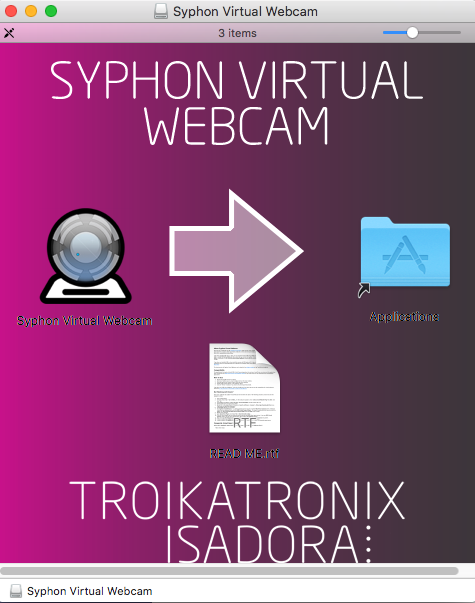
The file you will then unzip, is a .dmg file. Double click the .dmg file. Follow the prompts that are kindly provided by the installer.
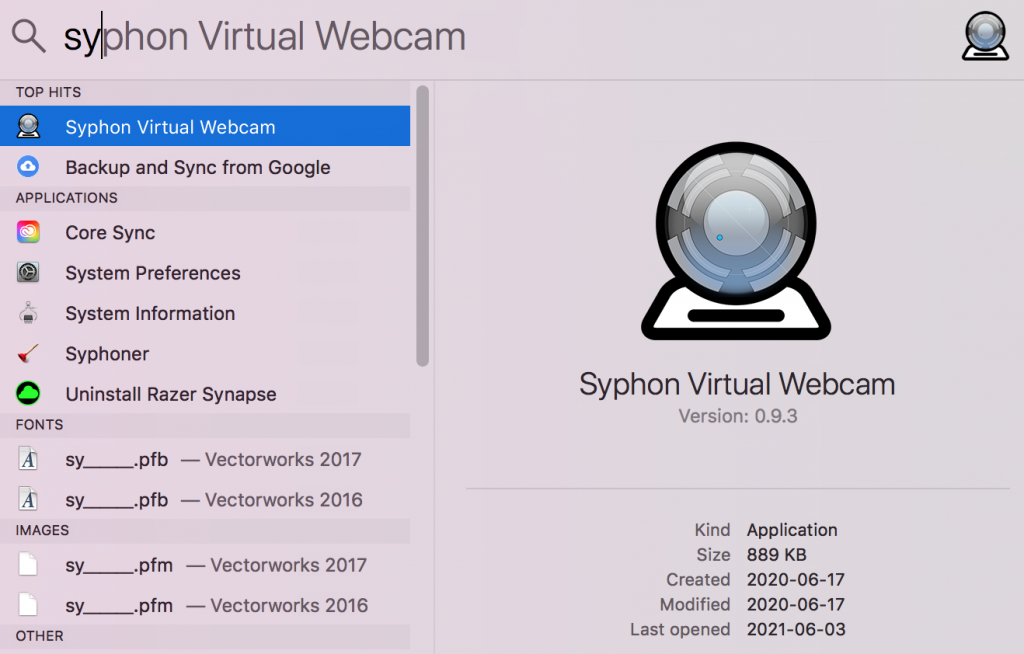
Once the installation is complete, search your applications and double click to launch!
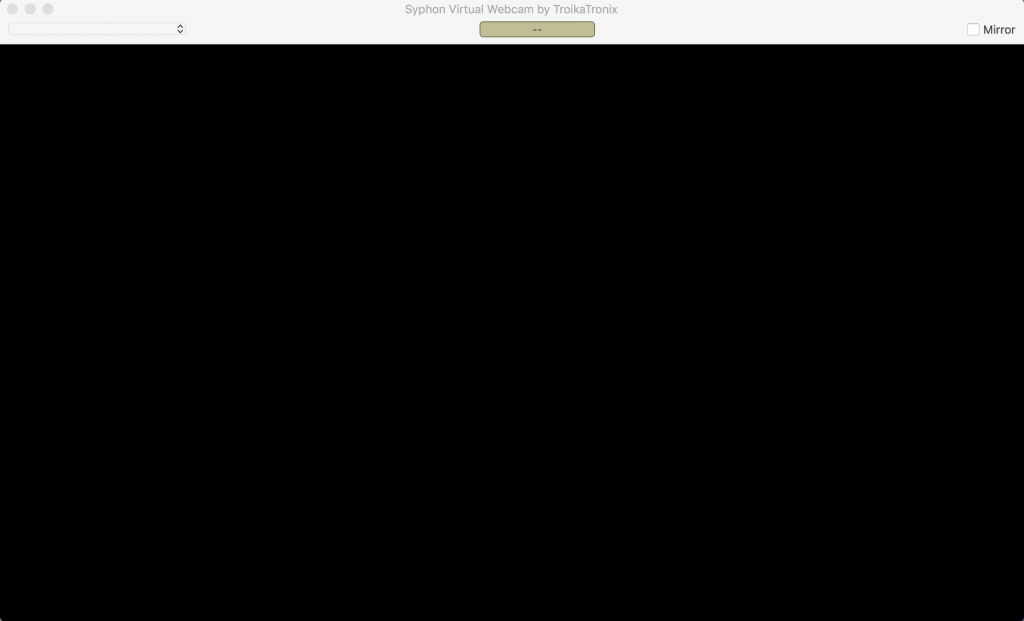
The window that will open looks like this:
Now, we need to give it something to broadcast! If you haven’t already done so, check out my tutorial for Isadora for live streaming to learn how to create some basic playback and connection templates.
As if we were about to output to OBS or another live streaming tool, we will be using a Syphon output. I am using Isadora in this example, but any app that allows for a Syphon video output should be compatible with this app.
Here is a small example patch:
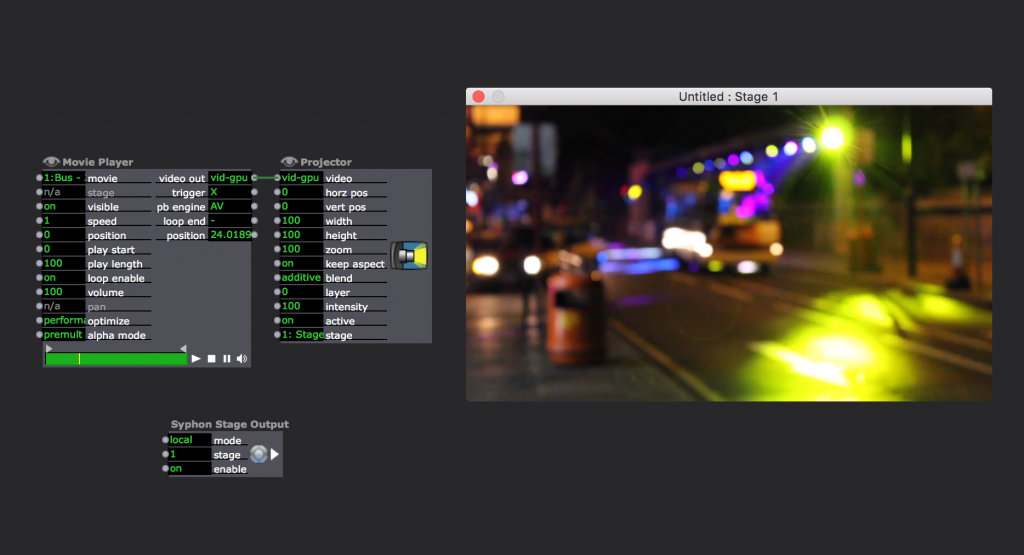
Syphon Stage Output is now taking the media that I am playing on “Stage 1” and sending it out to any Syphon compatible application that will take it. Now, if you check your Syphon Virtual Webcam window, set the source to “Stage 1 – Isadora”, or your respective output source, and a realtime, full-sized version of this video will now be on your webcam preview!

Next, we’ll need to find a place to send our media. The beautiful thing about this tool is that it allows you to choose the video you’re sending at any time to a video conferencing software, as well as just any regular webcam input!
I am now going to visit my video conferencing application of choice: Jitsi.Meet, and begin sending my own video:
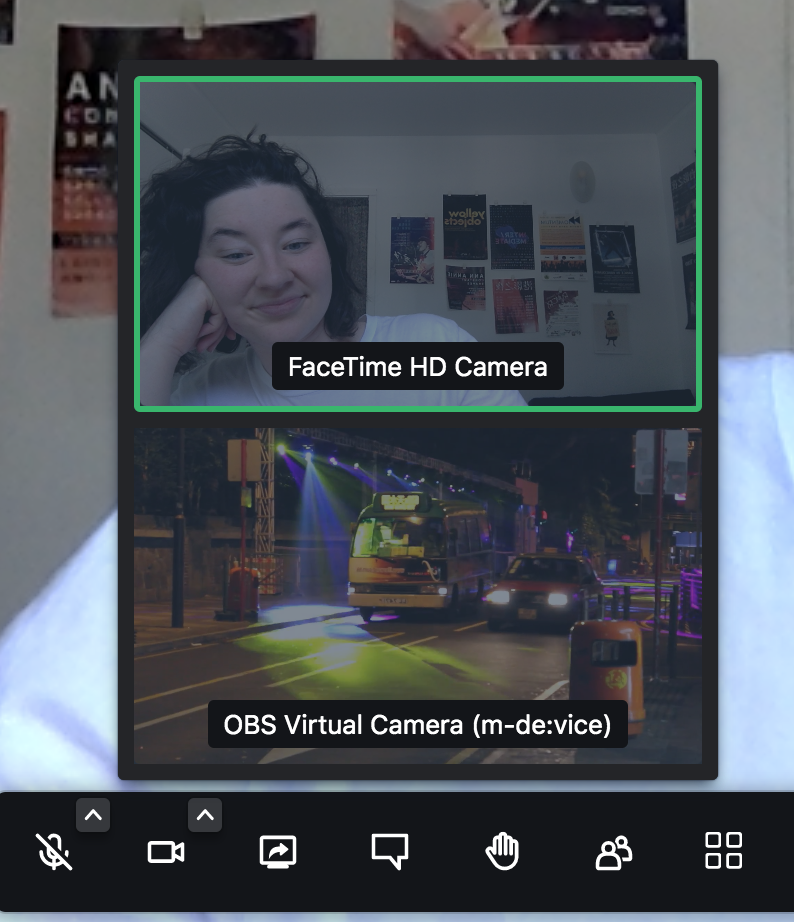
OBS Virtual Camera should appear as an option right away! If it does not, try the following steps:
- Refresh your browser
- Try a different browser (Firefox, Chrome)
- Try another video conferencing platform (Whereby, Cisco Webex, Google Meet)
- Utilise the troubleshooting and compatibility resources on the Syphon Virtual Webcam GitHub
Now that it’s working, select the OBS Virtual Camera, and enjoy your new input! If you are experiencing severe lag, try:
- Hardwiring your internet connection
- Restarting your computer
- Try a different browser
- Close some tabs
- Wait for it to work itself out (this works surprisingly well)
Now, you have the freedom to send anything you want into video conferencing room. This can help you in bypassing buggy screen sharing integrations, fake your own presence at a meeting, or provide accessibility or administrative information during an event.
Thanks always to my mentors: Sammy Chien, Milton Lim, Remy Siu, Mark Coniglio
Installing Isadora Plug-Ins
Installing plugins
As a new user of Isadora, you will quickly find that the community is an amazingly welcoming and warm place. This shows itself in many ways, including in this incredible add-ons page, where you can discover plugins made both by the Isadora development team, and users around the world. I will recommend that you install just a few plugins, specifically for those hoping to use Isadora for online arts and performance.
This part is a little bit complicated. Let’s download and install two Isadora actor plugins.
Download and install:
Once you open the .zip folders, this will appear:
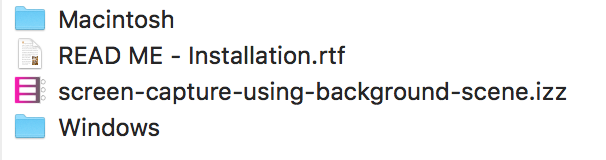
The “READ ME” file has some helpful instructions too.
Click into your respective OS folder. Don’t worry about the .scpt file, we’ll do it in a simpler way.
Open Isadora, and locate your toolbar!

Roll over the “Help” option and locate the “Open Plugins Folder” option
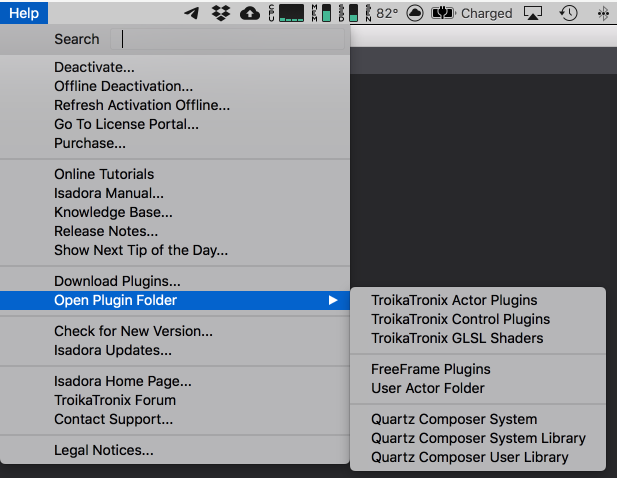
Select “Troikatronix Actor Plugins”
Now, simply drag the .izzyplug into the highlighted folder
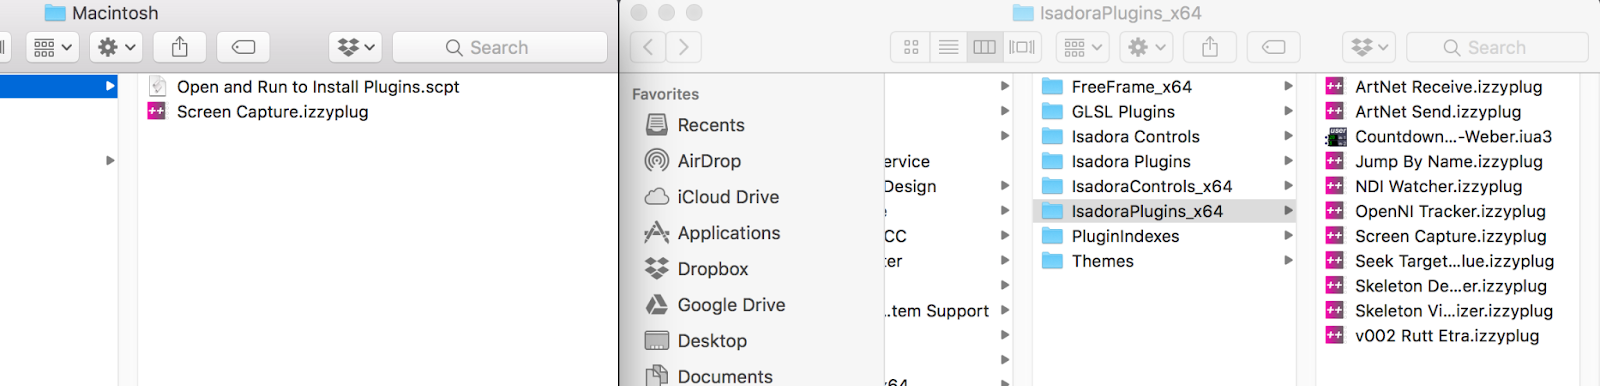
If you’re on PC, you’ll need to check which file you need to bring over. Please consult the “READ ME” inside the plugin folder!
Once the file is in your plugin folder, you’ll need to quit and restart Isadora.
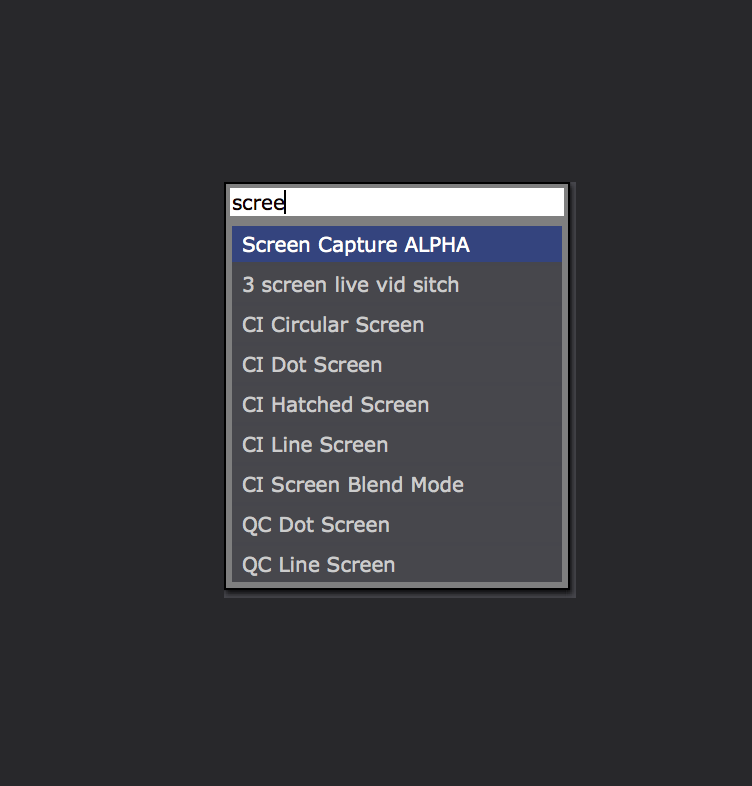
The plugin should now be available in your scene editor. Please check by double clicking in your scene editor (that’s the big empty grey space), and type the plugin name and see if it appears!
Now, repeat the process with the second plugin!
Isadora: live stream design for everyone
Isadora: the creativity server is a software that was created by Mark Coniglio, founder of Troika Ranch and Troikatronix. The Troikatronix team now spans across continents, with its main operations running out of Berlin, Germany.
Isadora is named for contemporary and modern dancer Angela Isadora Duncan (1877-1927), at one time known as “The Mother of Dance”, who was born in San Francisco but lived out the majority of her career and life in various cities in Europe and the Soviet Union. After her tragic death at age 50, her dance techniques and teachings were compiled and later taught by her adopted daughters.
The first line of code for Isadora was written by Mark Coniglio in the year 1999, and was released in 2000, meant to fill a gap in the creative technology sector, specifically created for integration with live contemporary dance work. The Troikatronix community has grown en masse across the world and through countless disciplines since then. It’s accessible and user-friendly interface has made creative technology available to so many different kinds of people in it’s time. It gave me the agency to creative my own live video work, and the freedom to work in a way that I could understand.
I would consider myself partial to Isadora because I am utterly enamoured with the community who uses it. The forum is incredibly supportive, it’s staff are incredibly wholesome and eager to teach and help, and I am so thrilled when I meet people who want to learn. So, let’s do it!
Isadora is a tool that has unlimited capacity and possibility for creation across a wide range of applications. This is my way of saying that you can do absolutely anything with it. Today, we are simply going to walk through a very basic live stream setup, so you can make your own seamless and beautiful live streamed event.

Our first step is to download the software onto your computer. Isadora is cross platform compatible, meaning that it is made for both Mac and PC. There is no Linux compatible version of Isadora.
To download the software, visit the Troikatronix website!
You may have Isadora downloaded on your computer already, and that’s awesome! But the first thing you’ll want to check out before using this guide is which version of the software you have!
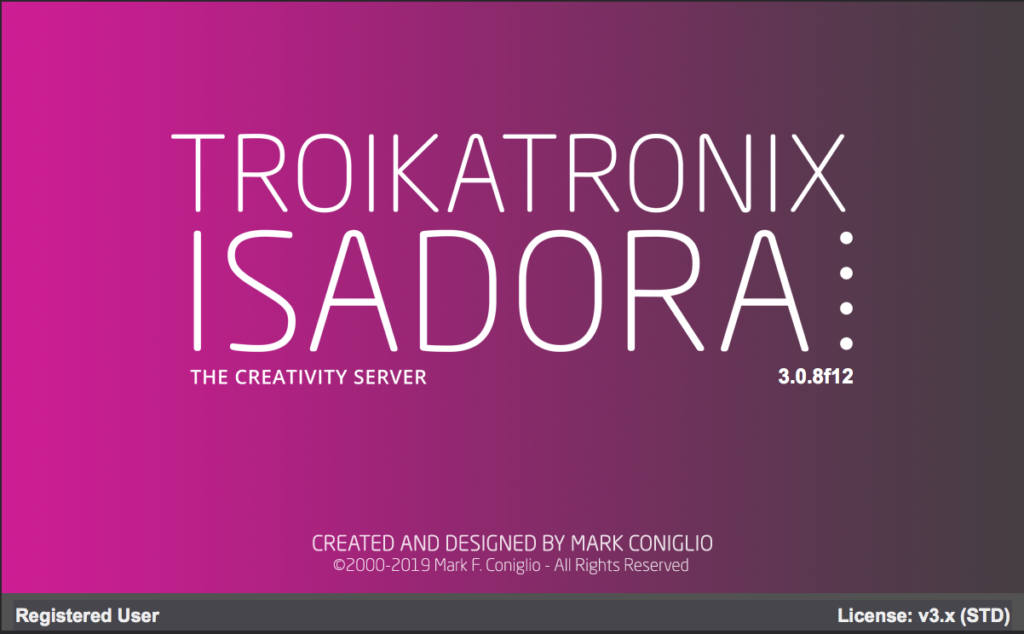
This guide will be using images from version 3.0.8f12. This most recent update features a new sound routing feature that I encourage you to take advantage of.
I am hoping to share what I’ve learned from 5 years in using the software, specifically how I have utilised Isadora as my primary tool for creating and executing live streamed virtual events throughout 2020-2021. I am not an expert in the software, and I implore you to visit the Troikatronix YouTube Channel for resources from the very very essentials, to the most advanced and philosophical applications of the software.
But here’s what we’ll do.
Build your first scene!
Open your freshly installed software, welcome to the Scene Editor!
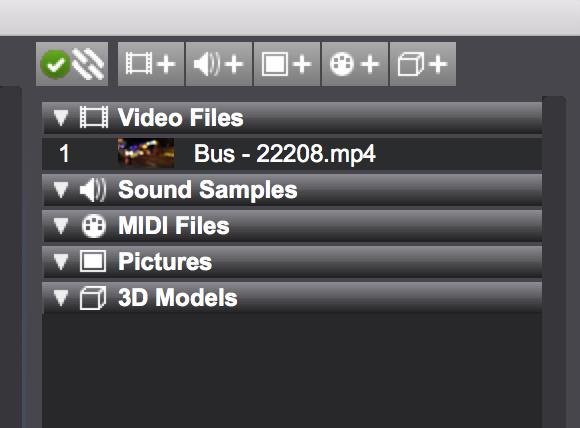
Import the media you’d like to share with the world, simply by dragging the file(s), into the media bin. It’ll help you out by sorting it into it’s appropriate spot.
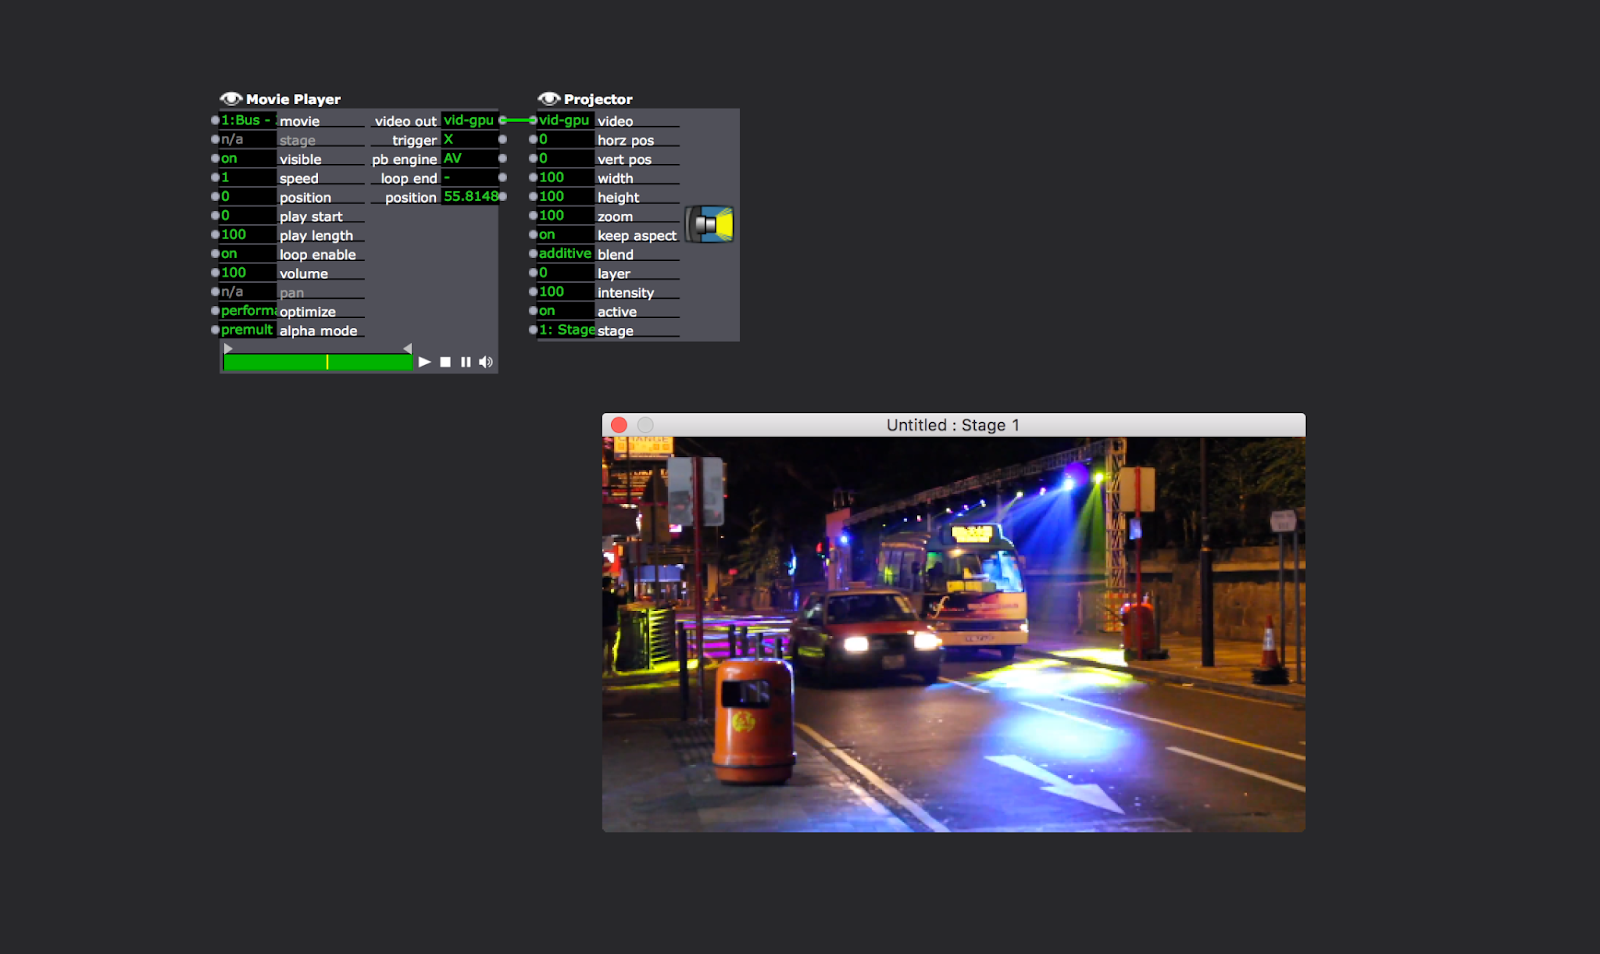
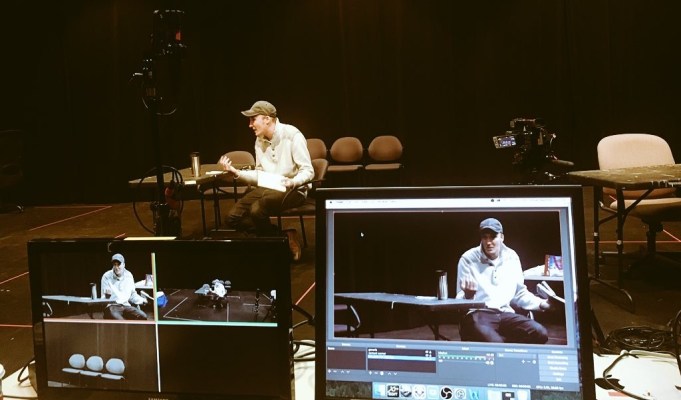
Play your media, either by dragging the media into the Scene Editor or by adding a “Movie Player” and a “Projector” Actor, you can start playing your media right away. Open your “Stage” by selecting “Output” in your toolbar and clicking “Force Stage Preview”.
To send sound to OBS, you’ll want to use the new sound routing feature in Isadora. This feature is hidden at the bottom of the Scene Editor. Find six white dots, grab and drag upwards:


The device you select is up to you. To send to OBS, I use a virtual audio routing system called Blackhole.
Introduce your work!
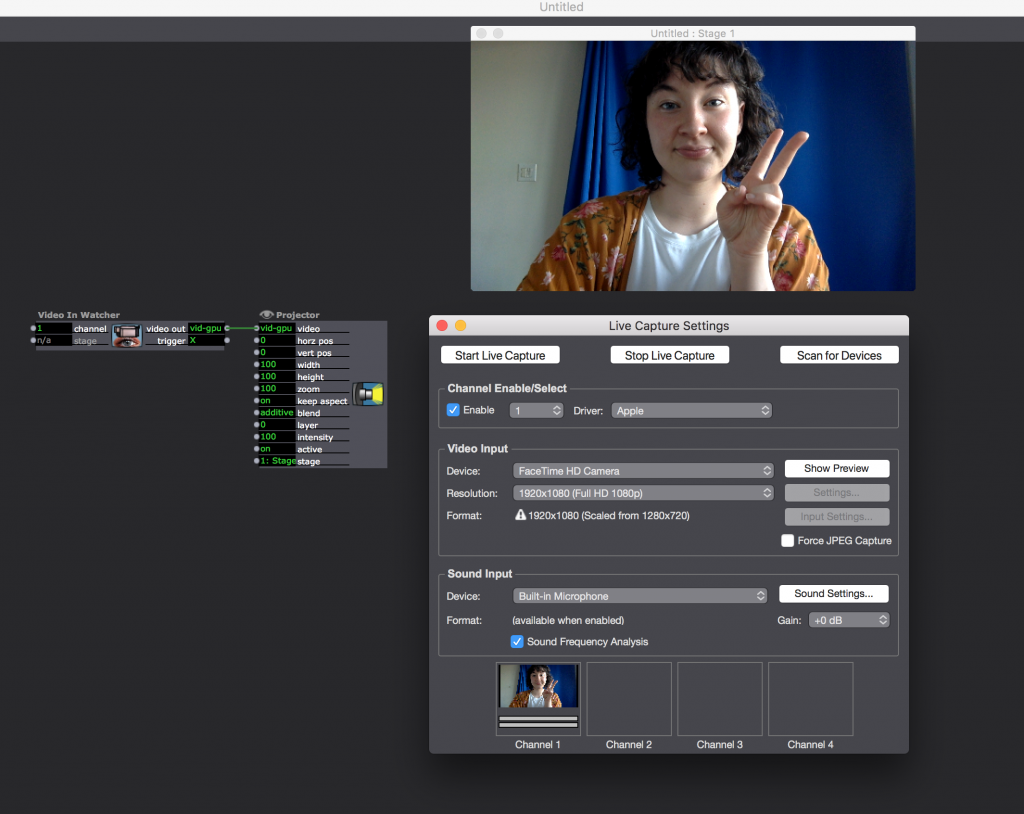
Let’s set up a super sleek and simple way to live capture your own video to introduce your work.
Referencing the above image, add a new scene, by rolling over your toolbar to “Scene”, and “Insert Scene”. You can also find your respective shortcut there for future reference!
This new scene will be for your introduction. You can slide it over to the “beginning” of your show by holding your mouse down and dragging it to where you want to go. Add a few more to practice!

Once your patch looks like mine, start your webcam (or other device) live capture by accessing the “Input” tab on your toolbar, and selecting “Live Capture Settings”. The above window should appear, and you will be able to scan for your device, select it, and hit “Start Live Capture”. Your face should appear! I like to handle local sound directly in OBS, so we don’t need to worry about this yet!
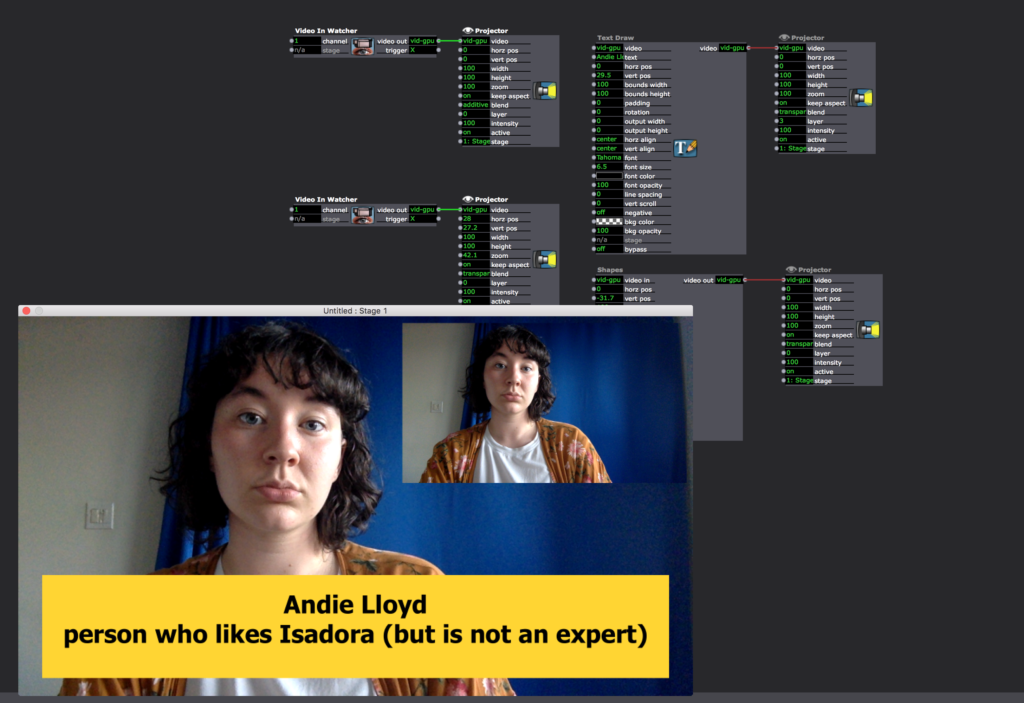
Now, you can be free to build this scene to your taste. In my example below, I have used the Text Draw and Shapes Actors to create a descriptive name card for myself. You can also see that I have added an additional input, in the event that I had an ASL interpreter with me in the space. Don’t be intimidated by the size and complexity of these actors! You only need to use the tools you want, to change the facets and things that you care to configure. Play around with these tools to get familiar with how they work, and use the undo function if something goes wrong!
Connect your collaborators!
Whichever video conferencing platform you like to use, this method will work for you. I like to use Jitsi Meet, a free and open-source platform that supports unlimited participants, screen sharing and some app integrations like YouTube. This step will require the use of a plug-in from the Isadora website. Please follow this guide on how to download a plug-in from Isadora. Once you’ve downloaded the Screen Capture plug-in, save & restart!
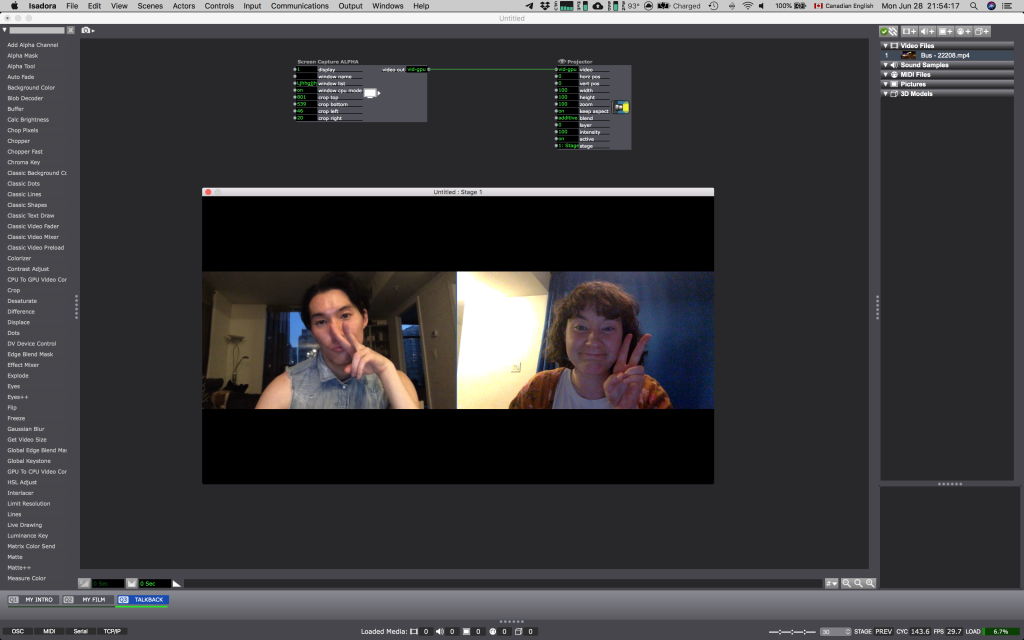
In the Screen Capture actor, you’ll find options to select your window. There are a few ways to do this, but it is super simple to select your meeting room. If you’re using only one screen, you’ll need to toggle on “window CPU mode”. This will allow your selected window to be visible at all times, even if you have something covering it on your screen. Once you’ve connected the screen capture to your conference, utilise the crop tools inside of the Screen Capture Actor. This crop allows you to easily crop and rescale your image without losing resolution. Play with it until you’re happy, and then feel free to use the Projector to move that image around. Repeat this process until you’re happy with the configuration!
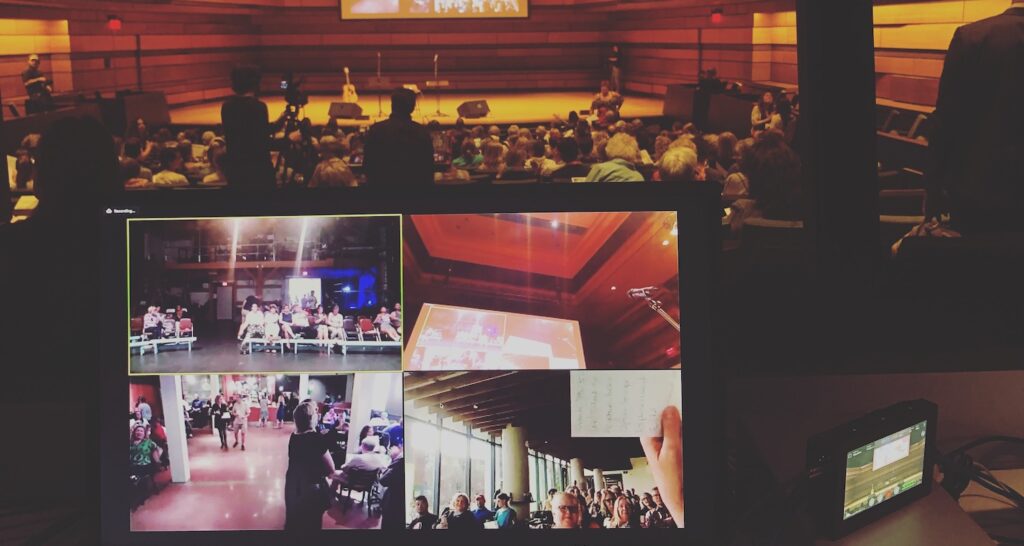
Stream your event!
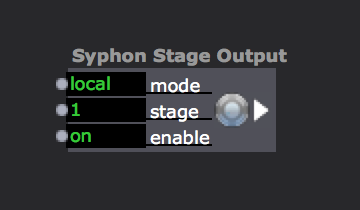
Now that you’ve built your event in full, it’s now time to share the work! The very last step before your streaming platform is to ensure that all of your scenes are able to send out to something called “Syphon”, or “Spout”. To do this, we simply need to add a little actor to each scene: Syphon Stage Output/Spout Stage Output.
Once this is in every scene, OBS will be able to receive this signal as a “Syphon Client” or “Spout Client”. Simply add this as a video source. You’ll be able to learn about this process through one of our OBS tutorials: OBS 101 and OBS Sources.
Enjoy your event and limitless design capabilities!
Read my guide to Syphon Virtual Webcam for a brief introduction on sending your Isadora creations into video conferencing software.
Ethical Interfaces: an introduction to the world of small software
What is open source? What is “small software”?
“‘Open source” is a term that originally referred to open source software (OSS). Open source software is code that is, in many cases, designed to be publicly accessible—anyone can see, modify, and distribute the code as they see fit.”
That’s what “open source” means. It generally also implies that the interface, the program or application is free for use by anyone. Users can donate to developers if they wish to do so. Free doesn’t always = accessible, but in the world of digital media, especially in creative industries, open source programs often allow creators a lot more freedom to experiment, contribute and enjoy the possibilities of a given software.
What I mean when I say “small software” is a software that meets a few of my own requirements:
- The software is usually created by/for users with a vested interest in the tools being developed.
- The software is priced at an accessible, and reasonable price for those who will benefit most from it.
- The developers are available to contact and open/amenable to suggestions, and committed to user-guided improvements.
- The software has a friendly and welcoming forum or community space where users can ask questions, share their work or resources.
Why open source? Why small software?
As a full-time artist AND a full-time activist, nothing makes me more proud than hosting a successful digital event with totally rad artists, using secure & open source platforms, created using software made by kind and wonderful developers.
I take immense pride in my commitment to protecting the digital and intellectual safety of my entire collaboration team on any given project. In my short career, I have been able to determine that the benefits of committing to working with ethical interfaces often outweigh the challenges presented by the troubleshooting processes that can sometimes inhibit or lengthen a creative process. This is not to say that problems are only present in open source applications or that large corporations offer flawless products that are more reliable.
But if given the choice, wouldn’t you rather feel good about what digital spaces you and your audience are creating and participating in? Digital safety is a frequently overlooked aspect of the creation process.
Creating digital works can and should be easily accessible to any person who wants to make them. The world of digital events is vast, and every person you speak to will have their own solution for any given problem you run into.
A large part of my practice is ensuring that my process and the tools I use are in alignment with my virtues as a human and an artist. I’d like to share some resources that I value in my work with digital creation, online security, and supporting ethical small businesses. All resources are cross platform unless otherwise noted:
Isadora: the creativity server [affordable, small software]
I’m biased because the developers at Isadora charmed me when I was young and impressionable. Since the beginning of my learning journey with Isadora, I have always felt unconditionally supported by the developers and the community on the Troikatronix forum.
While it is not free, nor open source, I sleep better at night knowing that my $30/month license fee is helping these artists do the hard work that allows me to more easily and freely create my art. There are a wealth of tutorials and deep dives by the creators and staff at Troikatronix available on their YouTube!
Jitsi.meet [open source, free]
I find myself using Jitsi more and more the further we dive into this collective digital world. What I appreciate about Jitsi is it’s unhinged versatility. It is free, open source, it allows for unlimited participants, HD video, locking meetings, YouTube integrations, screen sharing, end-to-end encryption for some users, and call-ins. There are other features that I would encourage you to look into during your next virtual meeting.
Jitsi is constantly in development, and therefore is not always 100% reliable. The vast majority of issues can be fixed with a browser switch or a quick refresh or permissions check. Things sometimes just don’t work, no matter what you do.
Existential Audio: Blackhole Virtual Audio Routing [free, MAC ONLY]
Existential Audio offers a free download of their virtual audio routing plugin with a quick email signup. It’s a simple way to redirect the sound coming from your video conference directly into a stream or recording interface. This is how I most frequently use it. It is widely compatible, and while it has no GUI (graphical user interface), it requires almost no setup and is fairly reliable.
VOICEMEETER [by donation, PC ONLY]
This Windows alternative for virtual audio routing features a wider array of settings, mixing and routing options, all for the price of a donation as low as $1! Many PC users in the digital arts world swear by this platform and, for such a reasonable price, it is certainly worth testing.
OBS stands for open broadcasting software. It is a collaborative project designed for livestreamers, and is super super simple to setup and use across all platforms (even Linux!). Whether you’re livestreaming, recording or sending your creation back into your video conference, OBS is the very last step.
It offers robust configuration options for livestreams (bitrate, latency, optimization for different platforms), and recording (size, location, reliable stream capturing).
Why go to all this effort?
My dedication to this ideology stems from my involvement in grassroots activism, where security, digital safety and anonymity are imperative for the efficacy of our campaigns and demonstrations. I have found that extending this learned culture of safe usage of digital interfaces into my artistic practice has helped myself and my collaborators to be free of self-censorship and have a better understanding of what our presence in digital spaces actually means in a greater socio-political context.
How does this work in practice?
Aside from utilising the tools suggested above, I have worked on creating “security briefings” for certain productions to help keep all artists safe.
One example is from a production that dealt with the sensitive themes around the Hong Kong pro-democracy movement, and in the interest of protecting all artists, we prepared pseudonyms and some protocol:
team security briefing
names, crediting, pseudonyms
Most of the team has opted to be credited under a different name for this production. This means that these team members want to keep their involvement in this piece out of the public eye. This means we’ll need to avoid using their real names in situations like:
- Discussing the piece with friends, family, colleagues
- Speaking to the media in interviews and appearances in promoting the piece
- In public promotional and print materials for yellow objects on all platforms where the show is being represented
- Other situations at the requests of each artist respectively
Everyone is currently comfortable using real names/emails/phone numbers within the circle of the production!
awareness of the situation & nsl safety
You can follow Alliance Canada-Hong Kong for updates on the Canada-Hong Kong advocacy front.
If you have plans to travel to Hong Kong or China, please familiarise yourself with the terms of the National Security Law’s border defying policies and plan to protect yourself accordingly.
secure storage of information & secure communication
I made a little info package for the safe usage of Telegram. Just a reminder that conversations are not encrypted by default (you must use the secret chat function), and that the desktop app version is not considered secure.
We are in the process of moving the personal information of the team off of the cloud and onto encrypted harddrives, as an extra precaution to protect addresses & SINs from any potential attacks.
onsite safety for team & participants
The Venue has a sophisticated and secure registration system that will ensure that all attendees are registered and issued a ticket. It is of course, not out of the question that we may encounter folks with the intention to disturb or interrupt our event. Try not to let anyone take your photo! If a situation does arise, staff will be onsite to assist and de-escalate.
tankie update
Be aware of sketchy follows/friend requests/likes on your social media and messengers. If someone like this engages you on social media about Hong Kong, this show, or your involvement in the community, do not reply. Block. Report.
Folks on the margins of the activism communities have been increasingly targeted in recent weeks, thanks to the massive waves of hate, threats, physical and verbal attacks that we’ve seen against more prominent activists in Canada.
No one is immune, really. Social engineering makes it really simple for people to see who we work with, what our work is and who we support.
Be careful, report anything suspicious to the team, and be aware that you’re not imagining things. It’s actually scary out there.
Let me know if you’d like more resources/info on this recent wave of suppression against Canadian HKers & their supporters.
In conclusion, I want to provide you with a few further resources if you are interested in further understanding my approach:
The Dramaturgy of Online Security by Davey Samuel Calderon
U.S. lawmakers ask Zoom to clarify China ties after it suspends accounts
Platform pros/cons by Andie Lloyd & Anthony Lee
Artist Disclaimer
Andie is a contractor with FOLDA and a co-digital technologist at Progress Lab 1422. An interdisciplinary artist coming from varying backgrounds in theatre, film, music, writing and more, they are committed to sourcing and researching the possibilities of accessible, professional and ethical methods of presenting digital & remote work.
As an artist who works with technology as their primary voice for artistic expression, they are often up against tech industry monoliths that often represent the very same systems of oppression that our work and the work we support seeks to dismantle. It is not a simple task to source and create a functional digital performance without years of experience and expertise in live A/V production. We acknowledge and understand that this access barrier is often what prevents us from presenting professional quality work.
I am interested not only in what is going to support your work technologically, but also ethically. I am interested in exploring open source, secure, small business, queer & BIPOC owned apps, APIs and platforms. When we can’t use these, it is important that we share the impact that platforms have on our global socio-political landscape and beyond.
I am new to this world too, and am trying, failing and learning everyday.
If you’re interested in discussing this aspect of my work in more detail, please reach out: digital@c-space.ca
OBS Sources
Audio Input Capture
The audio input source allows you to add a microphone to your stream/recording. If you do not have an audio input added to your scene, OBS will default to your computer’s built in microphone (if there is one).
STEP ONE: Click Audio Input Capture in the source list
STEP TWO: Select Create New and Name it
STEP THREE: Click on the field beside “Device” and select your device from the dropdown menu.
STEP FOUR: Click OK
STEP FIVE: Control over this audio input will be found in the OBS Audio Mixer at the bottom of your window.
Audio Output Capture
The audio output source allows you to add control over an audio output, such as specific sound monitoring into a set of headphones, or audio out to your stream.
STEP ONE: Click Audio Output Capture in the source list.
STEP TWO: Select Create New and Name it.
STEP THREE: Click on the field beside “Device” and select your device from the dropdown menu.
STEPH FOUR: Click OK
STEP FIVE: Control over this audio output will be found in the OBS Audio Mixer at the bottom of your window
Browser
The browser tool is similar to the webpage tool. The difference is that for webpage tool to be used, the window in question needs to be actually open and active on your computer during the stream. However, Browser allows you to type in any browser you would like and display it regardless as to whether or not that browser window is currently active elsewhere on your computer.
STEP ONE: Click Browser in the source list. Select Create New and name it.
STEP TWO: Remove the URL provided in the URL selector up until the https:// . (https://obsproject.com/browser-source)
STEP THREE: Type in the URL of your choice. For this example, I used google.ca
STEP FOUR: Resize the image depending on your preferences in the “width” and “height” section. The default is 800 pixels wide by 600 pixels high. You do not need to change this if you do not need to.
STEP FIVE: FPS can most likely stay at the default of 30. Changing this to 60 will give you a bit of a smoother view of the browser if it features moving content, but only if your computer can handle that extra work. The default of 30 should work perfectly fine for you most of the time.
STEP SIX: You may wish to choose “shutdown source when not visible” as this will be more efficient for your computer. An example of a situation where you would not want to do this is when closing the browser would disrupt or otherwise ruin settings or a browser view that you have set up.
STEP SEVEN: Click OK
STEP EIGHT: Resize/Crop/Reposition as necessary
Colour Source
Colour Source lets you add a solid coloured shape to your canvas. You are able to easily size this 4 sided shape to your preferences.
STEP ONE: Select Colour Source from the source list
STEP TWO: Select Create New and name it if you wish
STEP THREE: Click “Select Colour” and choose your preferred colour from the premade shades OR create your own custom colour by clicking anywhere within the colour gradient, and then clicking on the white arrow beside the colour bar to set your brightness. Once you are satisfied, you can click “add to custom colours” to save this colour for future use.
STEP FOUR: Click ok. Then ok again.
STEP FIVE: You can resize the colour by clicking and dragging on a corner of the shape (make sure the shape is selected and is highlighted with a red outline). Simply clicking and dragging keeps the aspect ratio locked and you will only be able to make the square bigger. If you want the flexibility to make a rectangle of some kind, hold shift while you click and drag to disable the aspect ratio lock.
STEP SIX: Position as necessary.
Display Capture
The Display Capture tool allows you to stream the live view of your computer screen. What you see within the frame of your computer monitor is exactly what your viewer will see.
STEP ONE: Select Display Capture from the source list
STEP TWO: Select Create New and name it if you wish
STEP THREE: Select which display you would like to show if you are running more than 1 monitor.
STEP FOUR: Cropping is built directly into this tool. Crop if you wish.
STEP FIVE: Click OK
STEP SIX: The window will appear much bigger than the canvas, so you will only see a portion of it. To fix this, left click on the window so it is highlighted red, then right click, select transform, and then fit to screen
STEP SEVEN: Resize and relocate as necessary
Image
The image tool simply allows you to display any image saved on your computer.
STEP ONE: Select Image from the source list
STEP TWO: Select Create New and name it if you wish
STEP THREE: Click Browse and select the image you wish to display from your computer’s finder window
STEP FOUR: Press OK.
STEP FIVE: Click and drag a red corner in order to resize. The aspect ratio will be locked by default so that you do not distort your image. If you would like to disable this, hold the shift key while clicking and dragging.
STEP SIX: Resize and relocate as necessary
Image Slideshow
The image slideshow tool is pretty self-explanatory, it’s a slideshow built up of images saved on your computer. This tool lets you get really detailed with how you want your slideshow to look, from how to trigger a slide to whether or not you want it to vanish when it’s done.
STEP ONE: Select Image Slideshow from the source list
STEP TWO: Select Create New and name it if you wish
STEP THREE: The visibility behavior tool is first and it’s options are very self explanatory. We recommend pausing the slideshow when not visible for the sake of efficiency
STEP FOUR: Select your slide mode. You can choose to have an automatic transition (set by your parameters) or you can choose to trigger a transition with a hot key of your choice. (See “HOTKEYS” tutorial section to learn how to do this).
STEP FIVE: Select what kind of transition you want to use. These transitions are the same as the SCENE TRANSITION feature and include CUT, FADE, SWIPE or SLIDE.
STEP SIX: Adjust your time between slides and transition speed to your preferences if the defaults don’t suit you
STEP SEVEN: The three optional features you can choose to activate are: LOOP – Continuously run through your slide show over and over in the order you added your photos to the tool; HIDE WHEN SLIDESHOW DONE – Only play through the slideshow once and then the tool vanishes; RANDOMIZE – Run through the photos you’ve added in a random order, not the order you added them to the tool
STEP EIGHT: Bounding Size/Aspect Ratio is default to automatic. This means that if your slideshow contains photos with different aspect ratios, OBS chooses the tallest and widest image of your slideshow, and uses that ratio to display all others. It is recommended that all photos you display are of the same aspect ratio so that you can avoid shrinking or distorting an image. You can choose to force all of the photos to appear in a certain aspect ratio if you would like by setting that in this field. Most of the time, Automatic will work for you just fine.
STEP NINE: Adding images into your slideshow is very straightforward. Click on the “+” to add a photo saved on your computer. Click on an image and clicking “-” will delete it. Click on an image and click on the up or down arrows to move the image down or up the list of photos (remember, if you didn’t tell the tool to randomize, it will follow the order you set here). Click on an image and then click the gear symbol to replace it with a different photo saved on your computer.
STEP TEN: Click OK
STEP ELEVEN: Resize and relocate as necessary
JACK Input Client
JACK is an open source (free to use) application (much like OBS) that allows for extremely nuanced sound control. It allows streamers the ability to really get into fine control of individual audio signals for a pro quality sound. Instructions on downloading and using JACK is not what this document is for, but here are the resources you need to get going if this is something you are looking for in your stream.
JACK Website and Software: https://jackaudio.org
Using JACK and OBS: https://obsproject.com/forum/resources/advanced-audio-capture-mac-os-x.142/
Media Source
The Media Source tool allows you to add a movie file (.MOV or .MP4 for example) to your stream.
STEP ONE: Select Media Source from the source list
STEP TWO: Select Create New and name it if you wish
STEP THREE: Click Browse and choose your file from your computer
STEP FOUR: Select your optional features by clicking or unclicking any you wish
STEP FIVE: Click OK
STEP SIX: Resize and relocate as necessary
Scene
The Scene Tool allows you to add a view of one of your other scenes to your current one!
STEP ONE: Select Scene from the source list
STEP TWO: Select one of your other scenes from the drop down list
STEP THREE: Click OK
STEP FOUR: Resize and relocate as necessary
Syphon Client
The Syphon Client tool allows you to use 3rd party syphon applications within an OBS Stream. To “syphon” video is one of the things OBS itself is very good at. Simply, it means to take a video stream (a view of your browser window, for example) from elsewhere on your computer and then translate it into a language that certain applications may use and read in a variety of different ways. There are many different applications that offer Syphoning services. A free to download, very easy to use Syphon application called Syphoner is recommended to use with this Source tool. It can be downloaded here: https://www.macupdate.com/app/mac/46760/syphoner
Once you have Syphoner downloaded and opened, select which window you want to syphon by simply clicking on one in the list it presents you. It’s very similar to choosing a browser window from the WINDOW CAPTURE tool. Once you have done that, return back to OBS and do the following:
STEP ONE: Select Syphon Client from the source list
STEP TWO: Select Create New and name it if you wish. Click OK
STEP THREE: Click on the field beside SOURCE and a drop down list should appear with your 1 and only syphon stream. Click it.
STEP FOUR: You can choose to crop the window should you need to. Just click on “crop” and enter numerical values in the TOP/BOTTOM/LEFT/RIGHT fields to get the look you want.
There is no graceful way to do this. Just write any number, see what it does, and adjust accordingly.
STEP FIVE: The syphon stream is much too large so right click it, select transform, then FIT TO SCREEN
STEP SIX: Resize and relocate as necessary
Text (Freetype 2)
This text tool allows you to type out text that you can position within your scene canvas.
It is important to note that if you play with this tool during your stream or recording, your typing will be seen live as you type (as long as you are typing on the active scene).
STEP ONE: Select Text (Freetype 2) from the source list
STEP TWO: Select Create New and name it if you wish. Click OK
STEP THREE: The first thing you are asked to do is select your font. To do this, click Select Font and select one from the list.
STEP FOUR: Once you’ve selected your font, you can type out whatever you would like in the field directly underneath beside the word “TEXT”. It is important to note that OBS will present the text exactly as you type it. So if you type a very long sentence, there
STEP FIVE: If you are using the custom text feature and typing out all of your text in the field, you can ignore most of the options that follow underneath it.
STEP SIX: Select the colour of your choosing for your text! OBS lets you get fancy, and you can choose a two colour gradient if you so wish.
STEP SEVEN: OUTLINE surrounds your text in a black outline, whereas DROP SHADOW creates a shadow behind your text. Select one or the other if you wish.
STEP EIGHT: Click OK
STEP NINE: Resize and relocate as necessary
VLC Video Source
The VLC Video Source is much like the regular Media source tool. It allows you to playback video files saved on your computer. The main difference is this tool allows you more flexibility in the file types that can be played (any video VLC can open, this source will play). Another feature this source offers is the ability to create a list of videos that will be played back in order or randomly… think of it as the image slideshow source for videos.
In order to use the VLC Video Source, you must have VLC Media Player downloaded on your computer. It can be found for free at: https://www.videolan.org/vlc/index.html *Note that both the VLC and OBS applications must be operating at the same bitrate (64bit or 32bit). It doesn’t matter which one you have downloaded, as long as they both are the same.
STEP ONE: Select VLC Media Source from the source list
STEP TWO: Select Create New and name it if you wish. Click OK
STEP THREE: Beside the playlist feild, press “+” and select a video file from your computer. Repeat this as many times as you would like.
STEP FOUR: If there are multiple audio tracks or subtitle tracks available in the file, this source will allow you to choose which one you would like to use.
STEP FIVE: Click OK
STEP SIX: Resize and relocate as necessary
Video Capture Device
Video Capture Device is one of the most important tools in OBS. It allows you to select a camera view (whether that be your computers built in webcam or an exterior webcam) and display that view in your broadcast. This tool is most likely what you’ll be using to broadcast yourself in your stream.
STEP ONE: Select Video Capture Device from the source list
STEP TWO: Select Create New and name it if you wish. Click OK
STEP THREE: Click on the field beside “device” to activate the drop down list of all available inputs.
STEP FOUR: Select your webcam of choice
STEP FIVE: Ensure “use preset” is selected and select a resolution of your choice.
STEP SIX: Selecting “Use Buffering” will help smooth out stuttering playback, where as leaving it unselected can help prevent delay in playback if that becomes a problem
STEP SEVEN: Click OK
STEP EIGHT: Resize and relocate as necessary
Window Capture
Window Capture is the source tool that allows you to display any browser window currently active on your computer. Essentially, it’s a screen share view that you are able to broadcast.
STEP ONE: Select Window Capture from the source list
STEP TWO: Select Create New and name it if you wish. Click OK
STEP THREE: Click on the field beside the red “window” to activate the drop down list of all available windows.
STEP FOUR: Select the window of your choice
STEP FIVE: Click OKSTEP SIX: Crop, resize and relocate as necessary
Deleting a Source
Don’t want a source you’ve created any more? No problem. Simply click on the source in the source list so that it is highlighted and then hit “backspace” or “delete” to get rid of it.
Editing a Source
If you’ve changed your mind and want to edit some of the core settings of a source, no need to delete and recreate it. Just double click the source in the list to bring up all of its settings.
Using Groups
After clicking “+” in the source list, at the very bottom you will notice that there is a “Group” option. You can choose to group together sources for all sorts of reasons, but one of the main incentives to organizing your source list in this way is that a group of sources will all move together once selected. So if for whatever reason you want sources to move together when you click and drag them, a group will make your life much easier.
STEP ONE: Select Group from the source list
STEP TWO: Select Create New and name it if you wish
STEP THREE: The group has now been created and added to your source list. Now click and drag on the sources in the list and drop them over top of the group you have created.
STEP FOUR: You will know that you have been successful in adding the source to the group because it will now appear indented under the group. Or if you click on the little arrow beside the group, the source name of everything within the group should go away.
STEP FIVE: To remove something from a group, just do the opposite action. Click on the source within the group and drag it to elsewhere in the source list in a location that is not within the group.
Hotkeys
OBS allows you to assign any key on your keyboard to do anything you want it to. Swap scenes, make a source visible or invisible, start or stop a movie or control your slide show with a quick press of a button.
STEP ONE: On a mac, in the top left corner of your screen, click on OBS and then Preferences.
STEP TWO: In the sidebar, click on “Hotkeys”
STEP THREE: This section of the preferences will now show every single scene and source in your OBS file. Look down the list to see what kinds of things you want easily accessible to you.
STEP FOUR: To assign a hotkey, simply click on the field beside the setting you want to have access to, and then click on the key you want to assign to it. The key you have chosen should now appear in that field.
STEP FIVE: If you want more than one key to do the same function, you can add as many as you want by clicking the “+” button at the end of the line.
STEP SIX: To clear a hotkey, select the field you want to clear and then press the garbage can at the end of the line.
STEP SEVEN: If you’ve added an additional hotkey line to have two or more hot keys for a single function, but changed your mind and no longer want it, press the “-” at the end of the line to delete your added hot key field. You cannot delete an original hot key field.
STEP EIGHT: If you’re looking for access to a specific function within a source, it may not be with the rest of that source’s hot key fields. FOR EXAMPLE: If you’re looking to assign a hot key to control your image slideshow, that control won’t be found under the scene header where the rest of image slideshow controls are found. Instead you must continue to scroll until you reach the header that says “Image Slideshow”. That’s where you’ll be able to assign your slideshow trigger. STEP NINE: Once you’ve made all of the changes you want to make. Simply click OK in the bottom right and start testing out your new hotkeys!
The Automatic Scene Switcher Tool
This is a really handy feature hidden in the settings of OBS. Basically what this tool lets you do is assign rules which trigger transitions to specific scenes. For example: using this tool you could tell OBS to transition to a scene that says “PLEASE STAND BY” every time you leave the OBS application. You could tell OBS to transition to a scene that screen shares what you are doing just by clicking on your internet browser. Just like with everything else in OBS, the possibilities are endless. Here’s how you do it.
STEP ONE: On a mac, in the top bar click “tools”, then “automatic scene switcher”
STEP TWO: On the top of this new window, the field on the left that occupies most of the window width is your access to all active computer applications. Click the arrow on the right side of the field to drop down the application list.
STEP THREE: On the right side beside the applications, is the scene list. Select the scene you want to correspond to the application you have chosen. For example: if I have chosen safari in my application list, and Scene 2 in the scene list. Now every time I click on Safari, OBS will automatically transition to scene 2, regardless of where it is or what it’s doing.
STEP FOUR: Press “+” to add that rule to the rule list. Repeat this as much as you would like. Press “-” to delete a rule set you no longer want.
STEP FIVE: Below the rule creation is an option that you can select that says “When no window matches, switch or don’t”. This means that if you clicked on safari and OBS transitioned to your screen share and then you go to check your email, how do you want OBS to respond? If you wanted OBS to stay doing what it’s doing. Select “Don’t Switch”. However, if you automatically want OBS to switch to a scene you’ve built that says, “PLEASE STAND BY” as soon as you click on your email, then click “Switch to:” and select the scene you want.
STEP SIX: Once you’re ready, click START then CLOSE the settings window. STEP SEVEN: You must go back to this tool set and STOP the automatic scene switcher again when you are done with it.
Output Timer
The output timer allows you to automate stopping your recording or streaming after a user defined amount of time.
STEP ONE: On a mac, in the top bar click on Tools and then “Output Timer”
STEP TWO: Select your time in either the “Stop Recording” or “Stop Streaming” row and then press start
STEP THREE: Click Close
STEP FOUR: The timer will start upon the start of your stream or recording NOT as soon as you push start or close the setting window
STEP FIVE: Once the time has expired, the stream or recording will automatically end
OBS 101
OBS (Open Broadcast Software) is a free tool that we recommend using in tandem with other video design softwares in order to record and broadcast your work. It can be downloaded for free at: https://obsproject.com
OBS (Open Broadcast Software) is a funnel for video streams. It allows the user to take multiple video feeds (or images), put them all together, and then record or broadcast the content through a single, unified video feed.
OBS allows you to prerecord video, adding background images, text, and additional platforms (Zoom calls, webcam feeds, CdnStudio etc) and livestream to YouTube, Vimeo and Facebook live.
This page will walk you through basic tools for streaming, recording, and accessing your videos.
OBS Basic Tools for Streaming

SOURCES (bottom left): A source is a single stream of video or audio processed by your computer. Examples of sources include: internet browser windows, webcam feeds, movie files or even easy to edit text. Next week we’ll be releasing a full list and description of sources. If you want to read more about sources, click HERE.
SCENES (bottom left): A scene is your canvas for arranging and organizing various sources and/or text and images in order to create your desired custom video stream. It can be as simple or as complex as you want it to be. If you want to create a video with a few different “looks”, select the “+” on the bottom left and name it. If you are recording/streaming one “look” no need to add others. Some examples of when other looks would be helpful include title cards, credits, “blackouts”, etc.
AUDIO MIXER: This allows you to monitor your audio inputs and control the volume output to your stream/recording. OBS automatically defaults to using your computer’s built in microphone. If you are using an external microphone you will need to add it as a source in the same way you would a video source.
SCENE TRANSITIONS: Scene Transitions are an optional feature in OBS where you can freely switch between SCENES by fading, cutting or sliding between them over a user amount of time.
CONTROLS: This is where you will find options to stream and record your work. Streaming and recording are self-explanatory and studio mode allows you to make edits to your stream (adding text and video) while you’re streaming.
Getting Started
STEP ONE: Download OBS here: https://obsproject.com. This a free platform. If you have the means, consider donating to the open source developers.
STEP TWO: Before you connect OBS to your streaming service of your choice, you’ll want to ensure you have the correct settings. Edit your settings by selecting SETTINGS under CONTROL in the bottom right corner.
Recommended Settings
If you’re not sure about what settings will best work for your stream on YouTube, Twitch, or Facebook, visit their website for help guides. Below we will share some recommended settings for basic streams and if we ignore a specific function it may be too advanced to cover in this beginners guide.
Before you get started, it’s a good idea to do an upload/download speed test to ensure your internet can handle the stream. You can read about upload speeds here.
Once you’ve selected SETTINGS under CONTROL in the bottom right corner, a display box will pop up with tabs along the left side, including:
STEP ONE: GENERAL: here you can change the colour of the OBS interface and your preferred language. If you’re streaming and you want to automatically save your stream as a recording, under output select “automatically record when streaming”. If your computer has trouble with processing, we don’t recommend checking this box. As the action of recording is heavy on your CPU, you may experience difficulties, abnormalities or at worst crashes if your computer does not have sufficient specifications or memory space.
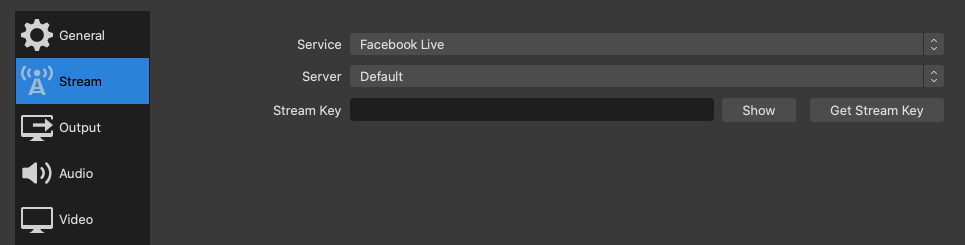
STEP TWO: STREAM: under “stream type”, select “streaming services” and it will bring up a list of services that integrate with OBS (twitch, youtube, periscope, fb, etc). It’s best to come back to this section when you’re ready to stream. Under “server”, you can leave it on auto or select a server that’s closer to your physical location. “Stream key” is where you will eventually paste the key for the service you’re using. More on this later.
STEP THREE: OUTPUT: If you’re streaming, you may want to increase the “video bitrate” to 3000 or 3500 but don’t make it too high for people to have issues streaming your content. The “recording path” allows you to select where you want the videos to be saved on your computer and the file format.
STEP FOUR: VIDEO: allows you to adjust resolution. It’s best to set the base camera resolution to the size of your display and the output resolution to either 1920 x 1080 (preferred) or if you’re on a lower powered system, you can change this to 1080 x 720. 60 FPS is best or you can try reducing to 30 FPS
STEP FIVE: HOTKEYS: you can assign keyboard shortcuts.
Audio
OBS has the capacity to record audio from your desktop, a microphone, and through additional sources.
STEP ONE: Go to the mixer tab along the bottom.
STEP TWO: Beside “desktop audio”, select the settings gear and select “properties” from the drop down menu. Select “default”. This will record/stream audio from your desktop. If you are running sound through something on your desktop, this function should pick up that audio in your stream.
STEP THREE: Underneath “desktop audio” you’ll see “mic/aux”, select the settings icon, then properties. Here you can select the microphone you’d like to use.
Recording with OBS
STEP ONE: Once you’re ready to record your work, preset your cues by going back to the first scene you have established. Ensure the audio is picking up whatever microphone you are using (laptop microphone, external USB microphone, etc.).
STEP TWO: In CONTROLS (bottom right) click START RECORDING.
STEP THREE: On a Mac, the video will be saved in your MOVIES folder as an MKV file. If you can’t find your videos, select FILE > SHOW RECORDINGS. If you have VLC Media Player, you can play an MKV file. If not, select FILE > REMUX RECORDINGS.
Streaming with OBS
STEP ONE: Once you are ready to stream, under CONTROLS select START STREAMING. Because we have not yet setup the URL and Stream Key, we will be prompted to open settings to enter the URL and Stream Key in the ‘stream’ tab.
STEP TWO: Along the left side of the screen select STREAM and select which service/platform you are using.
STEP THREE: After you’ve selected your service, select GET STREAM KEY and it will walk you through accessing a stream key from whatever service you are using.
Studio Mode
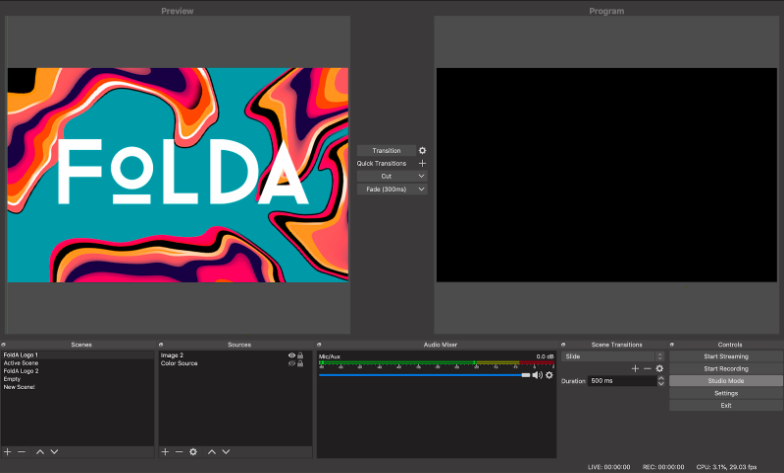
Studio Mode is a helpful way to view your broadcast or recording while it is happening. It allows you to view not only what you are currently broadcasting, but it also gives you a second “preview” view where you can set up your next scene before a transition. Load the scene by clicking on it, select the transition you want to use, and then press “transition” when you’re ready for your move.
Wavve: An Audio Captioning Tool
Wavve is an audio tool that allows you to take an audio file and convert it to an appealing video for social media. It also offers captioning! From their website, “Wavve gives you the power to leverage the audio content to create social videos that drive more reach & engagement around your brand & content”.
If you’ve ever seen our new captioned Thought Residencies, our secret is out! Our awesome associate Tia Lunn uses Waave to caption and add visuals to the audio file.
PRICING
Waave offers four different pricing packages:
Free: Customize your own design, create 1 minute of video monthly, and wavve branding included in videos
Alpha: Generate 10 minutes of video a month, Rollover up to 20 minutes of unused time, No Wavve branding on videos
Beta: Generate up to 30 minutes of video per month, Rollover up to 60 minutes of unused time
Gamma: Generate 300 minutes of video per month, 48 Minute clip length
USING WAVVE
STEP ONE: Go to https://wavve.co/ and sign-up!
STEP TWO: Select the first design UNDER DESIGN and select “EDIT DESIGN”. Here you can add a “waveform”, or a visual representation of an audio file. Along with adding waveforms, you can also add progress bars and format videos specially for phone screens.
STEP THREE: Now you will automatically return to the create page and scroll down to “YOUR AUDIO” and select “UPLOAD NOW” and upload the audio file. Then select GENERATE VIDEO.
STEP FOUR: Find your video (should be the most recent on the list) and select ADD CAPTIONS.
STEP FIVE: On the next page, select CREATE TRANSCRIPT.
STEP SIX: Be sure to edit the captions to ensure there is the correct spelling and phrasing and timing. You can also select a font style for captions.
STEP SEVEN: Download this finished video for socials. TIP: it’s a good idea to archive your videos for reference/visual continuity.
Trello: The Online Filing Cabinet
Trello is a free platform that can function as a digital filing cabinet. It is easily organized and can be accessed by a team of users so it may help your collaborators easily find documents online.
THE BASICS
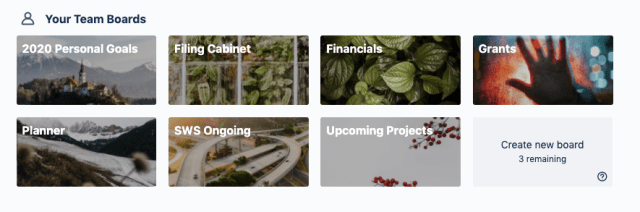
Boards: are like shelves in your filing cabinet. At SWS we organize our boards by activities like “foldA”, “grants”, and “admin”. On a free account, you can have up to 10 active boards.
Lists: are like file folders in your filing cabinet. At SWS we organize our lists chronologically and name them like we would a file in a filing cabinet, like “CCA Grant: March 2020” and “foldA marketing materials”. There is no limit to the lists you can have in a board.
Cards: are like individual documents in your filing cabinet.
SET-UP
Step one: Go to Trello and input your email address.
Step two: Trello will then run you through a tutorial that invites you to get started with naming some boards, lists, and cards.
USING TRELLO
Step one: On the far right side of your board you’ll see the capacity to + ADD ANOTHER LIST. If you want to add a card in the list, you’ll see + ADD A CARD.
Step two: There are many different functions within the cards. To modify what your card is for, first select the card. Along the right side you’ll see a few options, including:
Members: this allows you to directly tag members of your workspace in this document
Labels: this allows you to colour code cards for projects.
Checklist: this allows you to input a checklist into a card. This is especially helpful when writing grants, ensuring that you have collected all of the necessary material.
Due date: this allows you to select a due date for the card.
Attachment: this allows you to attach documents to cards.
Cover: this allows you to add a cover photo to a card.
Step three: You can rearrange cards by dragging them within a list or into another list.
Step four: You can see your other boards (or add new ones) by clicking BOARDS in the top left corner.
DIY Multi-Camera Livestreaming
This page will walk you through a simple multi-camera livestream set-up that you can achieve from your home. All you need is:
ONE: A stable WiFi connection
TWO: 2-4 different IOS devices with cameras and the ability to connect to the internet. One of these devices will act as the “switcher”, which helps you control the livestream, the other devices will act as cameras.
THREE: 2-4 device mounts (homemade or store-bought works)
FOUR: To download Switcher Studio on all devices. You will be asked to set-up an account. You will get the first two weeks as a free trial, then you can upgrade to keep your package. You can find pricing options here.
This set-up relies on a switcher software that allows you to utilize more than one camera lens, leveling up an at-home livestream in a major way! A switcher allows you to have more than one camera input and switch between angles in a livestream.
If you are interested in livestreaming from one single source to YouTube, Facebook, Vimeo or Instagram that’s easy! Most of these platforms have user-friendly ways of livestreaming from a laptop camera or phone. For additional resources on livestreaming, check out this article by our friends at Howlround. This page will continue to grow with additional information on sound integration.
Please note: this guide is written using Switcher Studio on an iPhone, display commands may look different on different devices.
SET-UP
Step one: Set-up all three devices on mounts or makeshift mounts capturing three angles of what you’d like to shoot. Each device should also be connected to a power. Avoid putting cameras right in front of speakers as this will make the video unstable.
Step two: Turn off notifications on all devices by going to Phone/iPad Notifications: Settings > Do Not Disturb > Slide to ON
Step three: Ensure all three devices are connected to the same WiFi network. This is very important. This style of livestreaming will only work if all devices are connected to the same WiFi network.
Step four: Open Switcher Studio on all devices. You may be asked to input your account information.
Step five: On whatever device you’d like to use as the switcher, USE AS SWITCHER. On other devices select REMOTE CAMERA MODE. They will show you a number that starts with rlcc://
Step six: Go back to your switcher device and beside the square that says WELCOME TO THE SHOW, select the little black square with a plus sign or on your iPhone, select the VIDEO CAMERA icon along the bottom. Under SWITCHER STUDIO select CAMERAS. Under SOURCES ON YOUR WI-FI NETWORK, select OTHER.
Step seven: Enter the rlcc:// numbers you see on the camera devices into your central control. You may be prompted to “accept” on cameras.
Step eight: Ensure the central control device is set to DIRECTOR MODE by selecting the box with an arrow on the bottom right corner, scrolling to the bottom where it says RECORDING and ensuring Director Mode is slid on.
Step nine: Once all three devices are connected, use the central control to begin by tapping the red circle record button in top right corner.
MULTI-CAMERAS
When using Switcher Studio while livestreaming, you can move between more than one camera in your stram. You do this by selecting the different feeds you see in your studio on your central control device. If there is a red square around a feed, that means it is live and a blue square means you are preparing your next feed. You can also control the zoom remotely by using the yellow magnifying glass along the left side.

SOUND
If you are working in a small space with good acoustics, you can try to use your device microphones but this is not recommended. If you have an external microphone for your device, that will improve the sound quality immensely.
In order to use an external microphone with your livestream set-up, you will require an I- Rig type system. Once you have connected an external microphone to the I-Rig system to the switcher device (not the cameras), you will need to select the audio input (it may say “external microphone” or I-Rig) in Switcher Studio. You should also make sure that whatever microphone you’re using plugs into a ¼ jack.
If you are planning to livestream a multi-media show with a sound mixer, your best option is to pull all sound directly from the mixer or a speaker when available. Using something like an I-Rig is cost effective and will allow you to broadcast the sound directly from the sound mixer to your live stream audience. The mixer or speaker has to have an available output and outputs will typically be 3 prong female XLR or ¼ inch jack. In order to plug into the switcher device you will need to plug into the I-Rig which requires a ¼ inch jack so you may need an adapter. Always double check all inputs and outputs before the day of live streaming.
If you’re working on a site, always get permission from the on site sound tech before plugging anything into their system. Make sure you have selected the correct audio input on the switcher device once everything is connected. You can test the level by pulling up your livestream on another device.
LIVESTREAMING
Switcher Studio will allow you to livestream to Facebook, YouTube, LinkedIn Live, Twitch or a Custom RTMP. Before going live, we recommend doing a private stream to test audio and video levels.
Step one: Select the square with the arrow coming out of it in the centre along the bottom of your screen.
Step two: Select which platform you’d like to use for livestreaming. Then follow the prompts to set up your account.
Zoom 101
Zoom is a video conferencing tool that allows for audio and video conferencing online. You can also use Facetime, Google Hangouts, or Skype but we’ve had the best luck with Zoom.
Zoom calls can host up to 100 participations. If you are using a free Zoom account, there is a 40 minute time limit on meetings with more than 2 participants. If you want to upgrade to house more participants in group meetings, you can find plans and pricing packages here. Online, Zoom also has additional resources available.
We have used Zoom to conduct meetings across distance and to facilitate a cross-country choir with Choir!Choir!Choir! at foldA in 2019.
SET-UP
Step one: Go to the Zoom website and in the top right corner select SIGN UP, IT’S FREE and confirm your email.
Step two: After you’ve confirmed your email, you’ll enter the Zoom platform.
Step three: Along the left side of the page under personal, you’ll see:
Profile: this is basic profile information. This will also allow you to integrate your GCAL.
Meetings: this is where you will schedule upcoming group meetings.
Webinars: this is where you can host large scale group information sessions.
Recordings: this is where you can access recorded meetings.
Settings: this is where you can adjust settings for your Zoom profile.
Step four: You will also see ADMIN which is where you can add users to your profile, assign roles, and adjust billing information.
SCHEDULING A ZOOM CALL
Step one: Along the left side, select MEETINGS then the button that says SCHEDULE A NEW MEETING.
Step two: Name your meeting for the appropriate topic, schedule a time (be mindful of timezone) and select the duration. If the meeting is a private meeting, you can require a password, otherwise it’s best to uncheck that.
Step three: Be sure that video and audio options are turned ON.
Step four: Decide on your MEETING OPTIONS.
Step five: Select SAVE.
Step six: To invite attendees, scroll down to INVITE ATTENDEES and select COPY THE INVITATION. Be sure to copy this entire invitation when sharing this link.
Step seven: If you have an integrated work calendar, you can also select ADD TO GOOGLE CALENDAR.
ZOOM ETIQUETTE
Mute your microphone if you aren’t speaking! With many different people on a call at once, sometimes additional background noise can make it difficult to concentrate. When your microphone is muted, simply press down on your space bar and hold it down to unmute your mic. When you’re done speaking, depress the space bar and your mic will be muted again.
Use headphones with a mic built in! This often helps with a clear a crisp sound.
Get permission before recording! If you are recording a meeting, it’s important you ask everyone for permission first.
Use the chat bar! If you want to make a note but don’t want to disrupt the person speaking, use the chat function in a zoom call!
Have party crashers? The good folks at Zoom have released a blog entry on keeping people from crashing your event. Read more.
Digital Resources: Taking the IRL to URL
SWS has learned a lot over the last 7 years about collaborating digitally across distance. We’ve experimented with online platforms that already exist and we’ve built our own, but most importantly, we’ve learned lessons we want to share with you in this precarious time.
We are all looking for ways to connect while rapidly transitioning our lives to a digital first approach. While the digital is not a substitute for life (and should not be treated as one) it does offer incredible tools for connection and collaboration. This is an unprecedented time but we are eager to work with the #cdncult community to learn new ways of working together…from our living rooms.
Over the coming weeks we’re going to walk you through some of our current systems in hopes you can adopt them to your communities, networks, and organizations.
Here you’ll find how-to guides for:
DIY Livestreaming: multi-camera livestreaming with a free app and Apple devices
Slack: a collaborative communication tool for teams
Zoom: a video conferencing system
Trello: an online filing cabinet
We know from foldA that many folks have already adopted these systems and are well versed in how they work. Stay tuned in the coming weeks as we continue to update this page with additional resources as we all level up together.
If you would rather talk to someone to help you set up these systems, SWS is offering consultation with Mo Horner and other members of our team. Mo has worked with SWS for the past 3 years as foldA’s Digital Content Producer and she’s a self-proclaimed #slacklord. We kindly ask that you read these how-to guides before you message us but we’d love to talk to you.
We are sharing these guides online for free but if your organization has the means to offer a donation for consultation, we’d really appreciate it! ? stay safe #cdncult
Slack 101

Slack is a collaborative messaging service that helps alleviate email fatigue, encourages digital collaboration, and clear communication between online teams. SWS has been relying on Slack to collaborate across distance since 2013. We’ve used it to run a company with offices across the country, facilitate foldA with every artist, volunteer, attendee, and staff member in a common workspace, and to stage manage a show in 4 cities at once.
Slack allows users to separate work/personal communication tools, encourage inter-team collaboration and clear communication, organize conversations easily and alleviate email overload.
This page will walk you through the process of creating a workspace, some basics about Slack, and offer some playful tips for becoming a #slacklord. If you’ve got any questions, slide join the FOLDA workspace and slide into @mariah.horner’s DMs or you can connect with SWS.
SLACK BASICS
Channels are chatrooms dedicated to certain topics. This is how you will communicate with members of your team. Channels can be project or team specific, but it is worth considering how you would like to organize your Slack workspace from the get-go.
Direct messages are for private communication.
Use threads and emojis! In order to keep communication clear, if you read a message, you can select the message and add an emoji below. If you are in a conversation with someone on slack, use a thread rather than an additional post. Click the message you are responding to and select “start thread”.
GETTING SET-UP
Step 1: Visit the Slack website. If you’d like to connect with a Slack representative directly, you can do so online.
Step 2: In the top righthand corner, select the purple button LAUNCH SLACK. Then select CREATE A NEW WORKSPACE. Follow the prompts to confirm your email address.
Step 3: After confirming your email address, you will begin to create a workspace. Slack will ask you “what is the name of your company or team” which will become the title of your workspace is and “what’s a project your team is working on” which will become the name of a channel.
Step 4: Slack will then ask you to invite teammates through email. You can invite a few here and you can also add members later on. You will also see a link that says “Get an invite link to share”. This way you can share your workplace through a link instead of an email invite.
Step 5: You will then be invited to see your first channel. We’ll explain below what a channel is. For now, select SEE CHANNEL and you will be invited to explore Slack through a tutorial helping you set up your workspace by messaging your channels, inviting contacts, and selecting a display name/password.
Step 6: For easy access on the go, you can instal the free Slack app on your Smartphone (iPhone, Android, etc.). You can also download the app on your desktop if using an Apple Mac or Windows. If you are not able to download Slack, you can still use a browser on your phone or laptop/computer to access the website and login.
CHANNELS
Think about Channels as chatrooms dedicated to certain topics or departments. This is how you can communicate with your team on specific topics, like email threads.
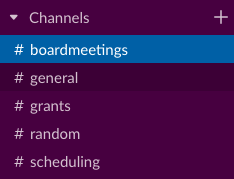
Step 1: Once you’re setup with Slack you will automatically be added to the #general channel, #random channel, and whatever channel you named during set-up.
Step 2: By clicking the + symbol next to the word Channels you can explore the other available channels in your workplace and add yourself to the relevant teams. If you are the workplace admin, you can add other channels. Some channels that may work for arts organizations include #grants, #scheduling, #fundraising and #boardmeetings.
DIRECT MESSAGING
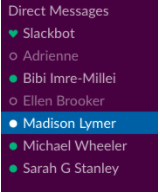
You can direct message anyone privately in your workspace.
Step 1: Along the left side of your screen, under “Channels” you’ll see “Direct Messages”, select the + to create a new direct message.
Step 2: Type in the name of the person you’d like to connect with, send them a message. You can add more than one person to a direct message if needed.
NOTIFICATIONS
Slack notifications are entirely customizable and have many options including the frequency of notifications and type of notification you receive. Note that Slack does not always automatically send you notifications so it’s important to check and see that you are getting notifications.
Step 1: From the desktop version click on the bell to customize your notifications. From the app select the three dots next to the magnifying glass and then select the ‘Do Not Disturb’ bell.
Step 2: From both these locations you now have the option to temporarily snooze notifications. This is useful when you would like to work without disruption temporarily or over the weekend. Protip: you can also trigger this by using /dnd (TIME). Example: ‘/dnd Monday’ would snooze notifications until the following Monday
Step 3: In the web version select ‘Do Not Disturb Schedule’ and in the app select the three dots> settings>Do Not Disturb. You can then input your scheduled hours as to when you do not want to be notified. Note that this will cause notifications to turn off at the same time every day.
Step 4: In the web version scroll up to customize notification types and down to customize notification sounds. In the app go back to settings and select ‘Notifications’. Here you can select if you want to receive all messages or only messages specific to you.
Step 5: If you’re feeling extra adventurous you can customize your notifications to each channel. This is most commonly used to mute a channel like ‘Random’ and receive all notifications about your team specific channel. To do this, select the settings wheel in the web version or click on the channel name in the app. You will then be able to customize your preferences for that specific.
Note: Notification preferences are a matter of personal preference and should be set up in a way that suits your workflow best. If you’re eager to stay on top of all the Slack chat in the beginning leave your notifications to ‘All New Messages’, if you’re worried about adding another workspace to your life try testing ‘Direct messages, mentions, and keywords’.
OTHER SLACK HACKS
Think about Slack like you would facebook messenger, or group messaging on an iPhone. It’s an informal and collaborative way to connect both on a browser and on your mobile device.
Tag people in conversations! You can tag people in conversations by using @theirname.
Format your messages! To bold text *bold me* and to italicize text _italicize me_.
Add gifs! When you are in the desktop browser version of your Slack workspace (yourworkspacename.slack.com), select the workspace name in the top left corner and select SETTINGS AND ADMINISTRATION > MANAGE APPS. Select BROWSE APP DIRECTORY. In the search bar, type giphy. Then along the left, select ADD TO SLACK, then ADD GIPHY INTEGRATION. Note: only workplace admin can authorize the app integration.
Add custom emojis! From your desktop browser version of your Slack workspace (yourworkspacename.slack.com), open the emoji bar by clicking on the smiley face icon in the message field. Select ADD EMOJI then Upload Image to select a file. Select Upload Image. Enter a name for your emoji, then click Save. Note: only workplace admin can add custom emojis.