The Halluci Nation
Writing Your Artist Statement
Through My Lens
The Maydee Box Live Demo
Ways of Being
Enthusiastic Contracting
The Maydee Box
Silent Disco
Selfie
Artist Interviews
Mini Panels
You Should Have Stayed Home
OBS Sources
Audio Input Capture
The audio input source allows you to add a microphone to your stream/recording. If you do not have an audio input added to your scene, OBS will default to your computer’s built in microphone (if there is one).
STEP ONE: Click Audio Input Capture in the source list
STEP TWO: Select Create New and Name it
STEP THREE: Click on the field beside “Device” and select your device from the dropdown menu.
STEP FOUR: Click OK
STEP FIVE: Control over this audio input will be found in the OBS Audio Mixer at the bottom of your window.
Audio Output Capture
The audio output source allows you to add control over an audio output, such as specific sound monitoring into a set of headphones, or audio out to your stream.
STEP ONE: Click Audio Output Capture in the source list.
STEP TWO: Select Create New and Name it.
STEP THREE: Click on the field beside “Device” and select your device from the dropdown menu.
STEPH FOUR: Click OK
STEP FIVE: Control over this audio output will be found in the OBS Audio Mixer at the bottom of your window
Browser
The browser tool is similar to the webpage tool. The difference is that for webpage tool to be used, the window in question needs to be actually open and active on your computer during the stream. However, Browser allows you to type in any browser you would like and display it regardless as to whether or not that browser window is currently active elsewhere on your computer.
STEP ONE: Click Browser in the source list. Select Create New and name it.
STEP TWO: Remove the URL provided in the URL selector up until the https:// . (https://obsproject.com/browser-source)
STEP THREE: Type in the URL of your choice. For this example, I used google.ca
STEP FOUR: Resize the image depending on your preferences in the “width” and “height” section. The default is 800 pixels wide by 600 pixels high. You do not need to change this if you do not need to.
STEP FIVE: FPS can most likely stay at the default of 30. Changing this to 60 will give you a bit of a smoother view of the browser if it features moving content, but only if your computer can handle that extra work. The default of 30 should work perfectly fine for you most of the time.
STEP SIX: You may wish to choose “shutdown source when not visible” as this will be more efficient for your computer. An example of a situation where you would not want to do this is when closing the browser would disrupt or otherwise ruin settings or a browser view that you have set up.
STEP SEVEN: Click OK
STEP EIGHT: Resize/Crop/Reposition as necessary
Colour Source
Colour Source lets you add a solid coloured shape to your canvas. You are able to easily size this 4 sided shape to your preferences.
STEP ONE: Select Colour Source from the source list
STEP TWO: Select Create New and name it if you wish
STEP THREE: Click “Select Colour” and choose your preferred colour from the premade shades OR create your own custom colour by clicking anywhere within the colour gradient, and then clicking on the white arrow beside the colour bar to set your brightness. Once you are satisfied, you can click “add to custom colours” to save this colour for future use.
STEP FOUR: Click ok. Then ok again.
STEP FIVE: You can resize the colour by clicking and dragging on a corner of the shape (make sure the shape is selected and is highlighted with a red outline). Simply clicking and dragging keeps the aspect ratio locked and you will only be able to make the square bigger. If you want the flexibility to make a rectangle of some kind, hold shift while you click and drag to disable the aspect ratio lock.
STEP SIX: Position as necessary.
Display Capture
The Display Capture tool allows you to stream the live view of your computer screen. What you see within the frame of your computer monitor is exactly what your viewer will see.
STEP ONE: Select Display Capture from the source list
STEP TWO: Select Create New and name it if you wish
STEP THREE: Select which display you would like to show if you are running more than 1 monitor.
STEP FOUR: Cropping is built directly into this tool. Crop if you wish.
STEP FIVE: Click OK
STEP SIX: The window will appear much bigger than the canvas, so you will only see a portion of it. To fix this, left click on the window so it is highlighted red, then right click, select transform, and then fit to screen
STEP SEVEN: Resize and relocate as necessary
Image
The image tool simply allows you to display any image saved on your computer.
STEP ONE: Select Image from the source list
STEP TWO: Select Create New and name it if you wish
STEP THREE: Click Browse and select the image you wish to display from your computer’s finder window
STEP FOUR: Press OK.
STEP FIVE: Click and drag a red corner in order to resize. The aspect ratio will be locked by default so that you do not distort your image. If you would like to disable this, hold the shift key while clicking and dragging.
STEP SIX: Resize and relocate as necessary
Image Slideshow
The image slideshow tool is pretty self-explanatory, it’s a slideshow built up of images saved on your computer. This tool lets you get really detailed with how you want your slideshow to look, from how to trigger a slide to whether or not you want it to vanish when it’s done.
STEP ONE: Select Image Slideshow from the source list
STEP TWO: Select Create New and name it if you wish
STEP THREE: The visibility behavior tool is first and it’s options are very self explanatory. We recommend pausing the slideshow when not visible for the sake of efficiency
STEP FOUR: Select your slide mode. You can choose to have an automatic transition (set by your parameters) or you can choose to trigger a transition with a hot key of your choice. (See “HOTKEYS” tutorial section to learn how to do this).
STEP FIVE: Select what kind of transition you want to use. These transitions are the same as the SCENE TRANSITION feature and include CUT, FADE, SWIPE or SLIDE.
STEP SIX: Adjust your time between slides and transition speed to your preferences if the defaults don’t suit you
STEP SEVEN: The three optional features you can choose to activate are: LOOP – Continuously run through your slide show over and over in the order you added your photos to the tool; HIDE WHEN SLIDESHOW DONE – Only play through the slideshow once and then the tool vanishes; RANDOMIZE – Run through the photos you’ve added in a random order, not the order you added them to the tool
STEP EIGHT: Bounding Size/Aspect Ratio is default to automatic. This means that if your slideshow contains photos with different aspect ratios, OBS chooses the tallest and widest image of your slideshow, and uses that ratio to display all others. It is recommended that all photos you display are of the same aspect ratio so that you can avoid shrinking or distorting an image. You can choose to force all of the photos to appear in a certain aspect ratio if you would like by setting that in this field. Most of the time, Automatic will work for you just fine.
STEP NINE: Adding images into your slideshow is very straightforward. Click on the “+” to add a photo saved on your computer. Click on an image and clicking “-” will delete it. Click on an image and click on the up or down arrows to move the image down or up the list of photos (remember, if you didn’t tell the tool to randomize, it will follow the order you set here). Click on an image and then click the gear symbol to replace it with a different photo saved on your computer.
STEP TEN: Click OK
STEP ELEVEN: Resize and relocate as necessary
JACK Input Client
JACK is an open source (free to use) application (much like OBS) that allows for extremely nuanced sound control. It allows streamers the ability to really get into fine control of individual audio signals for a pro quality sound. Instructions on downloading and using JACK is not what this document is for, but here are the resources you need to get going if this is something you are looking for in your stream.
JACK Website and Software: https://jackaudio.org
Using JACK and OBS: https://obsproject.com/forum/resources/advanced-audio-capture-mac-os-x.142/
Media Source
The Media Source tool allows you to add a movie file (.MOV or .MP4 for example) to your stream.
STEP ONE: Select Media Source from the source list
STEP TWO: Select Create New and name it if you wish
STEP THREE: Click Browse and choose your file from your computer
STEP FOUR: Select your optional features by clicking or unclicking any you wish
STEP FIVE: Click OK
STEP SIX: Resize and relocate as necessary
Scene
The Scene Tool allows you to add a view of one of your other scenes to your current one!
STEP ONE: Select Scene from the source list
STEP TWO: Select one of your other scenes from the drop down list
STEP THREE: Click OK
STEP FOUR: Resize and relocate as necessary
Syphon Client
The Syphon Client tool allows you to use 3rd party syphon applications within an OBS Stream. To “syphon” video is one of the things OBS itself is very good at. Simply, it means to take a video stream (a view of your browser window, for example) from elsewhere on your computer and then translate it into a language that certain applications may use and read in a variety of different ways. There are many different applications that offer Syphoning services. A free to download, very easy to use Syphon application called Syphoner is recommended to use with this Source tool. It can be downloaded here: https://www.macupdate.com/app/mac/46760/syphoner
Once you have Syphoner downloaded and opened, select which window you want to syphon by simply clicking on one in the list it presents you. It’s very similar to choosing a browser window from the WINDOW CAPTURE tool. Once you have done that, return back to OBS and do the following:
STEP ONE: Select Syphon Client from the source list
STEP TWO: Select Create New and name it if you wish. Click OK
STEP THREE: Click on the field beside SOURCE and a drop down list should appear with your 1 and only syphon stream. Click it.
STEP FOUR: You can choose to crop the window should you need to. Just click on “crop” and enter numerical values in the TOP/BOTTOM/LEFT/RIGHT fields to get the look you want.
There is no graceful way to do this. Just write any number, see what it does, and adjust accordingly.
STEP FIVE: The syphon stream is much too large so right click it, select transform, then FIT TO SCREEN
STEP SIX: Resize and relocate as necessary
Text (Freetype 2)
This text tool allows you to type out text that you can position within your scene canvas.
It is important to note that if you play with this tool during your stream or recording, your typing will be seen live as you type (as long as you are typing on the active scene).
STEP ONE: Select Text (Freetype 2) from the source list
STEP TWO: Select Create New and name it if you wish. Click OK
STEP THREE: The first thing you are asked to do is select your font. To do this, click Select Font and select one from the list.
STEP FOUR: Once you’ve selected your font, you can type out whatever you would like in the field directly underneath beside the word “TEXT”. It is important to note that OBS will present the text exactly as you type it. So if you type a very long sentence, there
STEP FIVE: If you are using the custom text feature and typing out all of your text in the field, you can ignore most of the options that follow underneath it.
STEP SIX: Select the colour of your choosing for your text! OBS lets you get fancy, and you can choose a two colour gradient if you so wish.
STEP SEVEN: OUTLINE surrounds your text in a black outline, whereas DROP SHADOW creates a shadow behind your text. Select one or the other if you wish.
STEP EIGHT: Click OK
STEP NINE: Resize and relocate as necessary
VLC Video Source
The VLC Video Source is much like the regular Media source tool. It allows you to playback video files saved on your computer. The main difference is this tool allows you more flexibility in the file types that can be played (any video VLC can open, this source will play). Another feature this source offers is the ability to create a list of videos that will be played back in order or randomly… think of it as the image slideshow source for videos.
In order to use the VLC Video Source, you must have VLC Media Player downloaded on your computer. It can be found for free at: https://www.videolan.org/vlc/index.html *Note that both the VLC and OBS applications must be operating at the same bitrate (64bit or 32bit). It doesn’t matter which one you have downloaded, as long as they both are the same.
STEP ONE: Select VLC Media Source from the source list
STEP TWO: Select Create New and name it if you wish. Click OK
STEP THREE: Beside the playlist feild, press “+” and select a video file from your computer. Repeat this as many times as you would like.
STEP FOUR: If there are multiple audio tracks or subtitle tracks available in the file, this source will allow you to choose which one you would like to use.
STEP FIVE: Click OK
STEP SIX: Resize and relocate as necessary
Video Capture Device
Video Capture Device is one of the most important tools in OBS. It allows you to select a camera view (whether that be your computers built in webcam or an exterior webcam) and display that view in your broadcast. This tool is most likely what you’ll be using to broadcast yourself in your stream.
STEP ONE: Select Video Capture Device from the source list
STEP TWO: Select Create New and name it if you wish. Click OK
STEP THREE: Click on the field beside “device” to activate the drop down list of all available inputs.
STEP FOUR: Select your webcam of choice
STEP FIVE: Ensure “use preset” is selected and select a resolution of your choice.
STEP SIX: Selecting “Use Buffering” will help smooth out stuttering playback, where as leaving it unselected can help prevent delay in playback if that becomes a problem
STEP SEVEN: Click OK
STEP EIGHT: Resize and relocate as necessary
Window Capture
Window Capture is the source tool that allows you to display any browser window currently active on your computer. Essentially, it’s a screen share view that you are able to broadcast.
STEP ONE: Select Window Capture from the source list
STEP TWO: Select Create New and name it if you wish. Click OK
STEP THREE: Click on the field beside the red “window” to activate the drop down list of all available windows.
STEP FOUR: Select the window of your choice
STEP FIVE: Click OKSTEP SIX: Crop, resize and relocate as necessary
Deleting a Source
Don’t want a source you’ve created any more? No problem. Simply click on the source in the source list so that it is highlighted and then hit “backspace” or “delete” to get rid of it.
Editing a Source
If you’ve changed your mind and want to edit some of the core settings of a source, no need to delete and recreate it. Just double click the source in the list to bring up all of its settings.
Using Groups
After clicking “+” in the source list, at the very bottom you will notice that there is a “Group” option. You can choose to group together sources for all sorts of reasons, but one of the main incentives to organizing your source list in this way is that a group of sources will all move together once selected. So if for whatever reason you want sources to move together when you click and drag them, a group will make your life much easier.
STEP ONE: Select Group from the source list
STEP TWO: Select Create New and name it if you wish
STEP THREE: The group has now been created and added to your source list. Now click and drag on the sources in the list and drop them over top of the group you have created.
STEP FOUR: You will know that you have been successful in adding the source to the group because it will now appear indented under the group. Or if you click on the little arrow beside the group, the source name of everything within the group should go away.
STEP FIVE: To remove something from a group, just do the opposite action. Click on the source within the group and drag it to elsewhere in the source list in a location that is not within the group.
Hotkeys
OBS allows you to assign any key on your keyboard to do anything you want it to. Swap scenes, make a source visible or invisible, start or stop a movie or control your slide show with a quick press of a button.
STEP ONE: On a mac, in the top left corner of your screen, click on OBS and then Preferences.
STEP TWO: In the sidebar, click on “Hotkeys”
STEP THREE: This section of the preferences will now show every single scene and source in your OBS file. Look down the list to see what kinds of things you want easily accessible to you.
STEP FOUR: To assign a hotkey, simply click on the field beside the setting you want to have access to, and then click on the key you want to assign to it. The key you have chosen should now appear in that field.
STEP FIVE: If you want more than one key to do the same function, you can add as many as you want by clicking the “+” button at the end of the line.
STEP SIX: To clear a hotkey, select the field you want to clear and then press the garbage can at the end of the line.
STEP SEVEN: If you’ve added an additional hotkey line to have two or more hot keys for a single function, but changed your mind and no longer want it, press the “-” at the end of the line to delete your added hot key field. You cannot delete an original hot key field.
STEP EIGHT: If you’re looking for access to a specific function within a source, it may not be with the rest of that source’s hot key fields. FOR EXAMPLE: If you’re looking to assign a hot key to control your image slideshow, that control won’t be found under the scene header where the rest of image slideshow controls are found. Instead you must continue to scroll until you reach the header that says “Image Slideshow”. That’s where you’ll be able to assign your slideshow trigger. STEP NINE: Once you’ve made all of the changes you want to make. Simply click OK in the bottom right and start testing out your new hotkeys!
The Automatic Scene Switcher Tool
This is a really handy feature hidden in the settings of OBS. Basically what this tool lets you do is assign rules which trigger transitions to specific scenes. For example: using this tool you could tell OBS to transition to a scene that says “PLEASE STAND BY” every time you leave the OBS application. You could tell OBS to transition to a scene that screen shares what you are doing just by clicking on your internet browser. Just like with everything else in OBS, the possibilities are endless. Here’s how you do it.
STEP ONE: On a mac, in the top bar click “tools”, then “automatic scene switcher”
STEP TWO: On the top of this new window, the field on the left that occupies most of the window width is your access to all active computer applications. Click the arrow on the right side of the field to drop down the application list.
STEP THREE: On the right side beside the applications, is the scene list. Select the scene you want to correspond to the application you have chosen. For example: if I have chosen safari in my application list, and Scene 2 in the scene list. Now every time I click on Safari, OBS will automatically transition to scene 2, regardless of where it is or what it’s doing.
STEP FOUR: Press “+” to add that rule to the rule list. Repeat this as much as you would like. Press “-” to delete a rule set you no longer want.
STEP FIVE: Below the rule creation is an option that you can select that says “When no window matches, switch or don’t”. This means that if you clicked on safari and OBS transitioned to your screen share and then you go to check your email, how do you want OBS to respond? If you wanted OBS to stay doing what it’s doing. Select “Don’t Switch”. However, if you automatically want OBS to switch to a scene you’ve built that says, “PLEASE STAND BY” as soon as you click on your email, then click “Switch to:” and select the scene you want.
STEP SIX: Once you’re ready, click START then CLOSE the settings window. STEP SEVEN: You must go back to this tool set and STOP the automatic scene switcher again when you are done with it.
Output Timer
The output timer allows you to automate stopping your recording or streaming after a user defined amount of time.
STEP ONE: On a mac, in the top bar click on Tools and then “Output Timer”
STEP TWO: Select your time in either the “Stop Recording” or “Stop Streaming” row and then press start
STEP THREE: Click Close
STEP FOUR: The timer will start upon the start of your stream or recording NOT as soon as you push start or close the setting window
STEP FIVE: Once the time has expired, the stream or recording will automatically end
OBS 101
OBS (Open Broadcast Software) is a free tool that we recommend using in tandem with other video design softwares in order to record and broadcast your work. It can be downloaded for free at: https://obsproject.com
OBS (Open Broadcast Software) is a funnel for video streams. It allows the user to take multiple video feeds (or images), put them all together, and then record or broadcast the content through a single, unified video feed.
OBS allows you to prerecord video, adding background images, text, and additional platforms (Zoom calls, webcam feeds, CdnStudio etc) and livestream to YouTube, Vimeo and Facebook live.
This page will walk you through basic tools for streaming, recording, and accessing your videos.
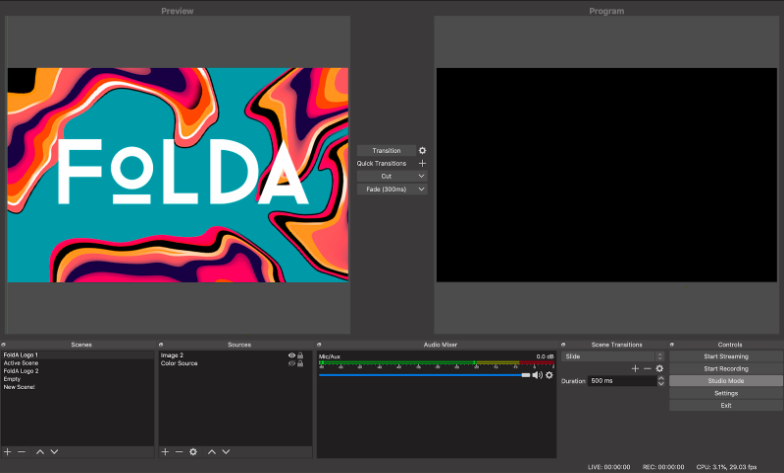
OBS Basic Tools for Streaming

SOURCES (bottom left): A source is a single stream of video or audio processed by your computer. Examples of sources include: internet browser windows, webcam feeds, movie files or even easy to edit text. Next week we’ll be releasing a full list and description of sources. If you want to read more about sources, click HERE.
SCENES (bottom left): A scene is your canvas for arranging and organizing various sources and/or text and images in order to create your desired custom video stream. It can be as simple or as complex as you want it to be. If you want to create a video with a few different “looks”, select the “+” on the bottom left and name it. If you are recording/streaming one “look” no need to add others. Some examples of when other looks would be helpful include title cards, credits, “blackouts”, etc.
AUDIO MIXER: This allows you to monitor your audio inputs and control the volume output to your stream/recording. OBS automatically defaults to using your computer’s built in microphone. If you are using an external microphone you will need to add it as a source in the same way you would a video source.
SCENE TRANSITIONS: Scene Transitions are an optional feature in OBS where you can freely switch between SCENES by fading, cutting or sliding between them over a user amount of time.
CONTROLS: This is where you will find options to stream and record your work. Streaming and recording are self-explanatory and studio mode allows you to make edits to your stream (adding text and video) while you’re streaming.
Getting Started
STEP ONE: Download OBS here: https://obsproject.com. This a free platform. If you have the means, consider donating to the open source developers.
STEP TWO: Before you connect OBS to your streaming service of your choice, you’ll want to ensure you have the correct settings. Edit your settings by selecting SETTINGS under CONTROL in the bottom right corner.
Recommended Settings
If you’re not sure about what settings will best work for your stream on YouTube, Twitch, or Facebook, visit their website for help guides. Below we will share some recommended settings for basic streams and if we ignore a specific function it may be too advanced to cover in this beginners guide.
Before you get started, it’s a good idea to do an upload/download speed test to ensure your internet can handle the stream. You can read about upload speeds here.
Once you’ve selected SETTINGS under CONTROL in the bottom right corner, a display box will pop up with tabs along the left side, including:
STEP ONE: GENERAL: here you can change the colour of the OBS interface and your preferred language. If you’re streaming and you want to automatically save your stream as a recording, under output select “automatically record when streaming”. If your computer has trouble with processing, we don’t recommend checking this box. As the action of recording is heavy on your CPU, you may experience difficulties, abnormalities or at worst crashes if your computer does not have sufficient specifications or memory space.
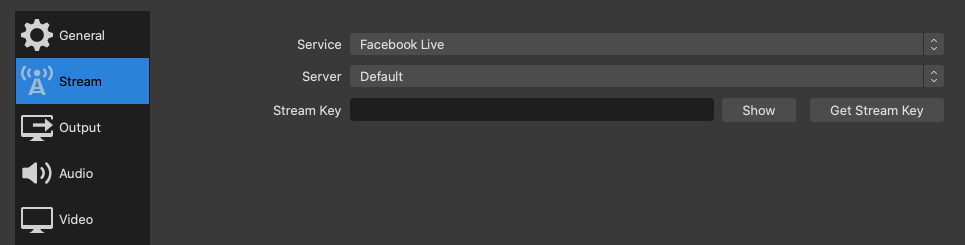
STEP TWO: STREAM: under “stream type”, select “streaming services” and it will bring up a list of services that integrate with OBS (twitch, youtube, periscope, fb, etc). It’s best to come back to this section when you’re ready to stream. Under “server”, you can leave it on auto or select a server that’s closer to your physical location. “Stream key” is where you will eventually paste the key for the service you’re using. More on this later.
STEP THREE: OUTPUT: If you’re streaming, you may want to increase the “video bitrate” to 3000 or 3500 but don’t make it too high for people to have issues streaming your content. The “recording path” allows you to select where you want the videos to be saved on your computer and the file format.
STEP FOUR: VIDEO: allows you to adjust resolution. It’s best to set the base camera resolution to the size of your display and the output resolution to either 1920 x 1080 (preferred) or if you’re on a lower powered system, you can change this to 1080 x 720. 60 FPS is best or you can try reducing to 30 FPS
STEP FIVE: HOTKEYS: you can assign keyboard shortcuts.
Audio
OBS has the capacity to record audio from your desktop, a microphone, and through additional sources.
STEP ONE: Go to the mixer tab along the bottom.
STEP TWO: Beside “desktop audio”, select the settings gear and select “properties” from the drop down menu. Select “default”. This will record/stream audio from your desktop. If you are running sound through something on your desktop, this function should pick up that audio in your stream.
STEP THREE: Underneath “desktop audio” you’ll see “mic/aux”, select the settings icon, then properties. Here you can select the microphone you’d like to use.
Recording with OBS
STEP ONE: Once you’re ready to record your work, preset your cues by going back to the first scene you have established. Ensure the audio is picking up whatever microphone you are using (laptop microphone, external USB microphone, etc.).
STEP TWO: In CONTROLS (bottom right) click START RECORDING.
STEP THREE: On a Mac, the video will be saved in your MOVIES folder as an MKV file. If you can’t find your videos, select FILE > SHOW RECORDINGS. If you have VLC Media Player, you can play an MKV file. If not, select FILE > REMUX RECORDINGS.
Streaming with OBS
STEP ONE: Once you are ready to stream, under CONTROLS select START STREAMING. Because we have not yet setup the URL and Stream Key, we will be prompted to open settings to enter the URL and Stream Key in the ‘stream’ tab.
STEP TWO: Along the left side of the screen select STREAM and select which service/platform you are using.
STEP THREE: After you’ve selected your service, select GET STREAM KEY and it will walk you through accessing a stream key from whatever service you are using.
Studio Mode
Studio Mode is a helpful way to view your broadcast or recording while it is happening. It allows you to view not only what you are currently broadcasting, but it also gives you a second “preview” view where you can set up your next scene before a transition. Load the scene by clicking on it, select the transition you want to use, and then press “transition” when you’re ready for your move.
Wavve: An Audio Captioning Tool
Wavve is an audio tool that allows you to take an audio file and convert it to an appealing video for social media. It also offers captioning! From their website, “Wavve gives you the power to leverage the audio content to create social videos that drive more reach & engagement around your brand & content”.
If you’ve ever seen our new captioned Thought Residencies, our secret is out! Our awesome associate Tia Lunn uses Waave to caption and add visuals to the audio file.
PRICING
Waave offers four different pricing packages:
Free: Customize your own design, create 1 minute of video monthly, and wavve branding included in videos
Alpha: Generate 10 minutes of video a month, Rollover up to 20 minutes of unused time, No Wavve branding on videos
Beta: Generate up to 30 minutes of video per month, Rollover up to 60 minutes of unused time
Gamma: Generate 300 minutes of video per month, 48 Minute clip length
USING WAVVE
STEP ONE: Go to https://wavve.co/ and sign-up!
STEP TWO: Select the first design UNDER DESIGN and select “EDIT DESIGN”. Here you can add a “waveform”, or a visual representation of an audio file. Along with adding waveforms, you can also add progress bars and format videos specially for phone screens.
STEP THREE: Now you will automatically return to the create page and scroll down to “YOUR AUDIO” and select “UPLOAD NOW” and upload the audio file. Then select GENERATE VIDEO.
STEP FOUR: Find your video (should be the most recent on the list) and select ADD CAPTIONS.
STEP FIVE: On the next page, select CREATE TRANSCRIPT.
STEP SIX: Be sure to edit the captions to ensure there is the correct spelling and phrasing and timing. You can also select a font style for captions.
STEP SEVEN: Download this finished video for socials. TIP: it’s a good idea to archive your videos for reference/visual continuity.